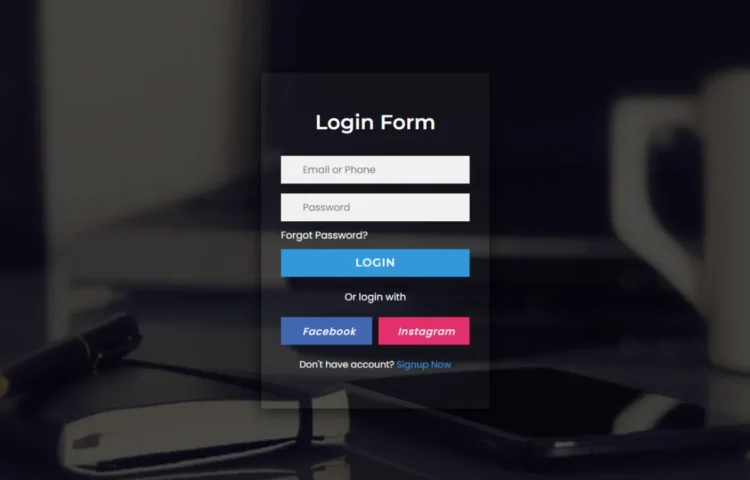
Are you looking for an elegant, modern, and transparent login form that you can quickly implement using HTML, CSS, and a little JavaScript? This step-by-step guide will walk you through creating a transparent login form design that’s lightweight, responsive, and visually stunning. It’s a great way to offer a sleek user experience while keeping your website fast and SEO-friendly.
What is a Transparent Login Form?
A transparent login form is a visually appealing input form where elements like the background or form fields have reduced opacity, giving a glass-like effect. This design is perfect for modern websites prioritizing minimalism and aesthetics, particularly for login pages, registration forms, and even portfolio or business websites. With just HTML, CSS, and minimal JavaScript for functionality, you can create a login form that stands out and adds a professional touch to your site.
Why Use Transparent Login Forms?
Transparent login forms offer more than just a great look—they also provide a user-friendly interface. This type of design is commonly used across many websites because:
- They focus on the user input fields while blending beautifully with the background.
- The design is lightweight, keeping your website’s performance optimized.
- It’s highly customizable, meaning you can easily change the background, text, and form details to fit your site’s theme.
Using only HTML and CSS, you can achieve a seamless login experience without relying on heavy frameworks, ensuring your website remains responsive and SEO-optimized.
Key Features of the Transparent Login Form
This transparent login form design includes the following:
- Transparent background that provides a sleek, glass-like appearance.
- Username and password fields with focus animations for a clean, professional look.
- Show/hide password toggle functionality using JavaScript for better user experience.
- Social media icons that can link to popular platforms like Facebook, Twitter, or LinkedIn.
- Fully responsive design that adapts to different screen sizes, ensuring mobile-friendly accessibility.
Step-by-Step Guide to Create a Transparent Login Form
Step 1: Building the HTML Structure
To start, create a basic HTML structure for the form. The form should contain input fields for the username, password, and a submit button. Here’s an example:
<!DOCTYPE html><html lang="en" dir="ltr"><head><meta charset="utf-8"><title>Transparent Login Form UI</title><link rel="stylesheet" href="style.css"><script src="https://kit.fontawesome.com/a076d05399.js"></script></head><body><div class="bg-img"><div class="content"><header>Login Form</header><form action="#"><div class="field"><span class="fa fa-user"></span><input type="text" required placeholder="Email or Phone"></div><div class="field space"><span class="fa fa-lock"></span><input type="password" class="pass-key" required placeholder="Password"><span class="show">SHOW</span></div><div class="pass"><a href="#">Forgot Password?</a></div><div class="field"><input type="submit" value="LOGIN"></div></form><div class="login">Or login with</div><div class="links"><div class="facebook"><i class="fab fa-facebook-f"><span>Facebook</span></i></div><div class="instagram"><i class="fab fa-instagram"><span>Instagram</span></i></div></div><div class="signup">Don't have account?<a href="#">Signup Now</a></div></div></div></body></html>
Step 2: Styling with CSS
Now, it’s time to make the form look stylish using CSS. You’ll use properties like opacity for the transparent effect and border-radius for smooth edges. Here’s how you can style it:
@import url('https://fonts.googleapis.com/css?family=Montserrat:400,500,600,700|Poppins:400,500&display=swap');*{margin: 0;padding: 0;box-sizing: border-box;user-select: none;}.bg-img{background: url('bg.jpg');height: 100vh;background-size: cover;background-position: center;}.bg-img:after{position: absolute;content: '';top: 0;left: 0;height: 100%;width: 100%;background: rgba(0,0,0,0.7);}.content{position: absolute;top: 50%;left: 50%;z-index: 999;text-align: center;padding: 60px 32px;width: 370px;transform: translate(-50%,-50%);background: rgba(255,255,255,0.04);box-shadow: -1px 4px 28px 0px rgba(0,0,0,0.75);}.content header{color: white;font-size: 33px;font-weight: 600;margin: 0 0 35px 0;font-family: 'Montserrat',sans-serif;}.field{position: relative;height: 45px;width: 100%;display: flex;background: rgba(255,255,255,0.94);}.field span{color: #222;width: 40px;line-height: 45px;}.field input{height: 100%;width: 100%;background: transparent;border: none;outline: none;color: #222;font-size: 16px;font-family: 'Poppins',sans-serif;}.space{margin-top: 16px;}.show{position: absolute;right: 13px;font-size: 13px;font-weight: 700;color: #222;display: none;cursor: pointer;font-family: 'Montserrat',sans-serif;}.pass-key:valid ~ .show{display: block;}.pass{text-align: left;margin: 10px 0;}.pass a{color: white;text-decoration: none;font-family: 'Poppins',sans-serif;}.pass:hover a{text-decoration: underline;}.field input[type="submit"]{background: #3498db;border: 1px solid #2691d9;color: white;font-size: 18px;letter-spacing: 1px;font-weight: 600;cursor: pointer;font-family: 'Montserrat',sans-serif;}.field input[type="submit"]:hover{background: #2691d9;}.login{color: white;margin: 20px 0;font-family: 'Poppins',sans-serif;}.links{display: flex;cursor: pointer;color: white;margin: 0 0 20px 0;}.facebook,.instagram{width: 100%;height: 45px;line-height: 45px;margin-left: 10px;}.facebook{margin-left: 0;background: #4267B2;border: 1px solid #3e61a8;}.instagram{background: #E1306C;border: 1px solid #df2060;}.facebook:hover{background: #3e61a8;}.instagram:hover{background: #df2060;}.links i{font-size: 17px;}i span{margin-left: 8px;font-weight: 500;letter-spacing: 1px;font-size: 16px;font-family: 'Poppins',sans-serif;}.signup{font-size: 15px;color: white;font-family: 'Poppins',sans-serif;}.signup a{color: #3498db;text-decoration: none;}.signup a:hover{text-decoration: underline;}
Step 3: Adding JavaScript for Toggle Password Visibility
You can add a show/hide password functionality to improve the form’s usability using JavaScript. This will allow users to toggle the visibility of their password, ensuring ease of use.
<script>const pass_field = document.querySelector('.pass-key');const showBtn = document.querySelector('.show');showBtn.addEventListener('click', function(){if(pass_field.type === "password"){pass_field.type = "text";showBtn.textContent = "HIDE";showBtn.style.color = "#3498db";}else{pass_field.type = "password";showBtn.textContent = "SHOW";showBtn.style.color = "#222";}});</script>
Step 4: Ensuring Responsiveness
Add media queries for different screen sizes to ensure the login form looks great on mobile devices. This will ensure the form adjusts its size and layout based on the device’s width.
@media (max-width: 600px) {
.field input[type="submit"]{
background: red;
border: 1px solid #2691d9;
color: white;
font-size: 18px;
letter-spacing: 1px;
font-weight: 600;
cursor: pointer;
font-family: 'Montserrat',sans-serif;
}
}
Want to Check Username Availability on Social Media?If you’re looking to check username availability on various social media platforms, visit NameChkr to find out!
Read Also
- Glassmorphism Login Form in HTML and CSS
Explore the stylish world of glassmorphism as you create a modern login form using HTML and CSS. This guide breaks down the design process step by step.
- Toggle Button using HTML, CSS, and JavaScript
Discover how to enhance user interaction by creating a sleek toggle button with HTML, CSS, and JavaScript. This tutorial covers everything from structure to styling.
- Responsive Cards in HTML and CSS
Learn how to design eye-catching responsive cards that adapt seamlessly to any device. This guide offers practical tips for achieving stunning layouts.
- Build a Google Gemini Chatbot Using HTML, CSS, and JS
Dive into chatbot development by creating a Google Gemini chatbot with HTML, CSS, and JavaScript. This tutorial will help you understand the basics of interactive forms.
Conclusion
By following this guide, you now have a beautifully designed Transparent Login Form using HTML, CSS, and JavaScript that’s functional and visually appealing. This login form can easily be customized and integrated into any website, providing a sleek and modern way to handle user authentication.
If you encounter any challenges or want to explore more customization options, feel free to download the complete source code by clicking the button below.

