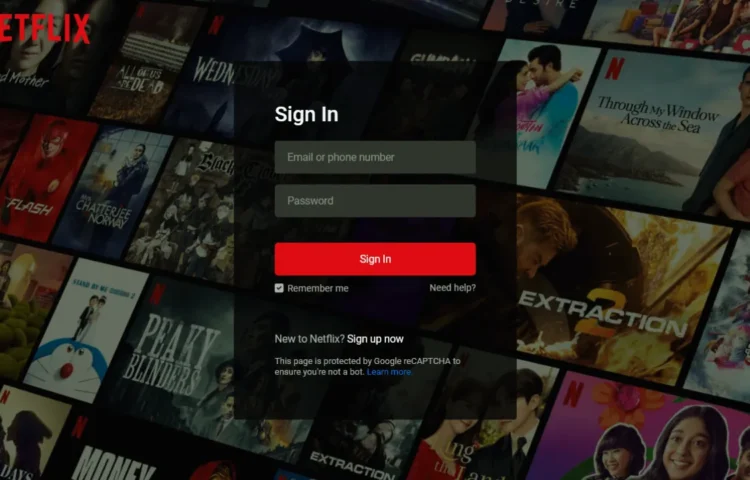
The sleek and familiar design of Netflix’s login page is one of the most well-known on the web. Have you ever thought to recreate this eye-catching interface, then you’re in the right place. In this guide, I’ll show you how to build a Netflix-inspired login page using HTML and CSS. Whether you’re a beginner or an intermediate developer, this project will help you improve your front-end skills while mimickingthe modern, user-friendly design of Netflix.
Why Build a Netflix-inspired Login Page?
For developers, recreating real-world projects is a fantastic way to practice. The Netflix-inspired login page is more than just an ordinary sign-in form—it has a clean, responsive design that works seamlessly across devices. By building this, you’ll learn how to position elements, style forms, and make a page responsive, all while mimicking a global platform’s aesthetic.
Let’s jump into the step-by-step process of building a Netflix-inspired login page.
Steps to Create a Netflix-inspired Login Page in HTML and CSS
1. Create Your Project Folder: Create a folder for your project. Inside this folder, create two files:
- index.html (for HTML structure)
- style.css (for styling)
You can also create an “Images” folder to add the Netflix logo or background images to the project.
2. Build the HTML Structure: In the index.html file, you’ll use semantic HTML to create the layout. Add the necessary elements such as a navigation bar, heading, form, input fields for username and password, and a “Sign In” button. Here’s an example of how your HTML might look:
<!DOCTYPE html><!-- Coding By Abhikesh - www.abhikesh.com --><html lang="en"><head><meta charset="UTF-8"><meta name="viewport" content="width=device-width, initial-scale=1.0"><title>Netflix Login Page | Abhikesh Kumar</title><link rel="stylesheet" href="style.css"></head><body><nav><a href="#"><img src="images/logo.svg" alt="logo"></a></nav><div class="form-wrapper"><h2>Sign In</h2><form action="#"><div class="form-control"><input type="text" required><label>Email or phone number</label></div><div class="form-control"><input type="password" required><label>Password</label></div><button type="submit">Sign In</button><divclass="form-help"><div class="remember-me"><input type="checkbox" id="remember-me"><label for="remember-me">Remember me</label></div><a href="#">Need help?</a></div></form><p>New to Netflix? <a href="#">Sign up now</a></p><small>This page is protected by Google reCAPTCHA to ensure you're not a bot.<a href="#">Learn more.</a></small></div></body></html>
3. Style the Page with CSS: In your style.css file, style the elements to match Netflix’s minimalist look. You’ll focus on fonts, spacing, and responsiveness to ensure the page looks good on all devices. Here’s some basic CSS for the login page:
@import url("https://fonts.googleapis.com/css2?family=Roboto:wght@400;500;600;700&display=swap");* {margin: 0;padding: 0;box-sizing: border-box;font-family: 'Roboto', sans-serif;}body {background: #000;}body::before {content: "";position: absolute;left: 0;top: 0;opacity: 0.5;width: 100%;height: 100%;background: url("images/hero-img.jpg");background-position: center;}nav {position: fixed;padding: 25px 60px;z-index: 1;}nav a img {width: 167px;}.form-wrapper {position: absolute;left: 50%;top: 50%;border-radius: 4px;padding: 70px;width: 450px;transform: translate(-50%, -50%);background: rgba(0, 0, 0, .75);}.form-wrapper h2 {color: #fff;font-size: 2rem;}.form-wrapper form {margin: 25px 0 65px;}form .form-control {height: 50px;position: relative;margin-bottom: 16px;}.form-control input {height: 100%;width: 100%;background: #333;border: none;outline: none;border-radius: 4px;color: #fff;font-size: 1rem;padding: 0 20px;}.form-control input:is(:focus, :valid) {background: #444;padding: 16px 20px 0;}.form-control label {position: absolute;left: 20px;top: 50%;transform: translateY(-50%);font-size: 1rem;pointer-events: none;color: #8c8c8c;transition: all 0.1s ease;}.form-control input:is(:focus, :valid)~label {font-size: 0.75rem;transform: translateY(-130%);}form button {width: 100%;padding: 16px 0;font-size: 1rem;background: #e50914;color: #fff;font-weight: 500;border-radius: 4px;border: none;outline: none;margin: 25px 0 10px;cursor: pointer;transition: 0.1s ease;}form button:hover {background: #c40812;}.form-wrapper a {text-decoration: none;}.form-wrapper a:hover {text-decoration: underline;}.form-wrapper :where(label, p, small, a) {color: #b3b3b3;}form .form-help {display: flex;justify-content: space-between;}form .remember-me {display: flex;}form .remember-me input {margin-right: 5px;accent-color: #b3b3b3;}form .form-help :where(label, a) {font-size: 0.9rem;}.form-wrapper p a {color: #fff;}.form-wrapper small {display: block;margin-top: 15px;color: #b3b3b3;}.form-wrapper small a {color: #0071eb;}@media (max-width: 740px) {body::before {display: none;}nav, .form-wrapper {padding: 20px;}nav a img {width: 140px;}.form-wrapper {width: 100%;top: 43%;}.form-wrapper form {margin: 25px 0 40px;}}
Key Learning Points
- Form Design: You’ll understand how to create a clean and user-friendly login form, focusing on accessibility and responsiveness.
- CSS Flexbox: You’ll use Flexbox to center the form on the screen, making it responsive and ensuring it looks good on all devices.
- Styling and Design: You’ll match the Netflix aesthetic, learning how to incorporate background images, colors, and minimalistic design elements that enhance the user experience.
Read Also
- Glassmorphism Login Form in HTML and CSS
Explore the stylish world of glassmorphism as you create a modern login form using HTML and CSS. This guide breaks down the design process step by step. - Toggle Button using HTML, CSS, and JavaScript
Discover how to enhance user interaction by creating a sleek toggle button with HTML, CSS, and JavaScript. This tutorial covers everything from structure to styling. - Responsive Cards in HTML and CSS
Learn how to design eye-catching responsive cards that adapt seamlessly to any device. This guide offers practical tips for achieving stunning layouts. - Build a Google Gemini Chatbot Using HTML, CSS, and JS
Dive into chatbot development by creating a Google Gemini chatbot with HTML, CSS, and JavaScript. This tutorial will help you understand the basics of interactive forms.
Conclusion and Final Words
Building a Netflix-inspired login page using only HTML and CSS is a great project for both beginners and seasoned developers. It allows you to explore crucial aspects of web development like form creation, styling, and making responsive designs. Projects like this help hone your front-end development skills, improve your understanding of CSS, and build your portfolio.
Once you’ve mastered this, you can take it a step further by adding additional features like floating labels, password toggle options, or even basic JavaScript form validation to make your project more dynamic.
If you encounter any issues while building your Netflix login page, don’t worry! You can download the source code for this project by clicking the “Download” button below.
Download Source Code
Ready to get started? Click the button below to download the source code for the Netflix login page and start your project today.

