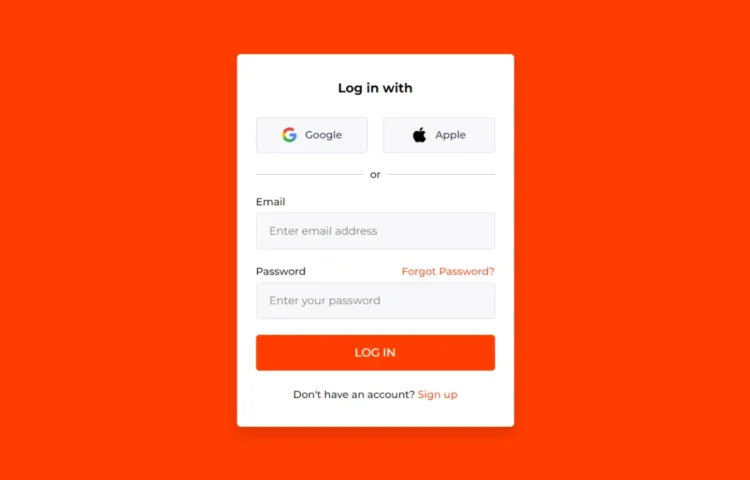
Creating a Basic Login Form is a fundamental skill for any aspiring web developer. If you’ve ever browsed various websites, you’ve likely encountered numerous basic login forms. Have you ever wondered how to design a basic login form using just HTML and CSS? The great news is that it’s entirely possible to build an elegant and functional basic login form using only these two powerful languages.
In this guide, we’ll walk you through the entire process of building a Basic Login Form using HTML and CSS. We’ll begin by establishing the HTML structure, followed by applying CSS styles to enhance its visual appeal. Additionally, we’ll incorporate modern features like Google and Apple login buttons to give it a contemporary touch. Let’s dive right in!
Steps to Build a Basic Login Form Using HTML and CSS
To create your simple login form using only HTML and CSS, follow these straightforward steps:
Step 1: Set Up Your Project
First, create a new folder to house your project files. You can name it anything you like; for example, login-form. Within this folder, create the following files:
- index.html: This file will act as the primary HTML document for your project.
- style.css: This file will contain all your CSS styling code.
- Images Folder: Create an Images folder where you will place logos for Google and Apple, which will be used in the form.
Step 2: Build the HTML Structure
Now, let’s start coding! Open your index.html file and add the necessary HTML markup. This code will lay out the basic structure of your login form using essential HTML elements like <form>, <div>, <label>, and <button>.
<!DOCTYPE html><!-- Source Codes By abhikesh - www.abhikesh.com --><html lang="en"><head><meta charset="UTF-8" /><meta name="viewport" content="width=device-width, initial-scale=1.0" /><title>Login Form in HTML and CSS | Abhikesh Kumar</title><link rel="stylesheet" href="style.css" /></head><body><div class="login_form"><!-- Login form container --><form action="#"><h3>Log in with</h3><div class="login_option"><!-- Google button --><div class="option"><a href="#"><img src="logos/google.png" alt="Google" /><span>Google</span></a></div><!-- Apple button --><div class="option"><a href="#"><img src="logos/apple.png" alt="Apple" /><span>Apple</span></a></div></div><!-- Login option separator --><p class="separator"><span>or</span></p><!-- Email input box --><div class="input_box"><label for="email">Email</label><input type="email" id="email" placeholder="Enter email address" required /></div><!-- Paswwrod input box --><div class="input_box"><div class="password_title"><label for="password">Password</label><a href="#">Forgot Password?</a></div><input type="password" id="password" placeholder="Enter your password" required /></div><!-- Login button --><button type="submit">Log In</button><p class="sign_up">Don't have an account? <a href="#">Sign up</a></p></form></div></body></html>
Step 3: Style Your Form Using CSS
Next, open your style.css file and add the appropriate CSS code to style your login form. This code will help your form look modern and visually appealing. You can customize it further by experimenting with different colors, fonts, and backgrounds to match your style.
/* Google Fonts Link */@import url('https://fonts.googleapis.com/css2?family=Montserrat:ital,wght@0,100..900;1,100..900&display=swap');/* Resetting default styling and setting font-family */* {margin: 0;padding: 0;box-sizing: border-box;font-family: "Montserrat", sans-serif;}body {width: 100%;min-height: 100vh;padding: 0 10px;display: flex;background: #ff3c00;justify-content: center;align-items: center;}/* Login form styling */.login_form {width: 100%;max-width: 435px;background: #fff;border-radius: 6px;padding: 41px 30px;box-shadow: 0 10px 20px rgba(0, 0, 0, 0.15);}.login_form h3 {font-size: 20px;text-align: center;}/* Google & Apple button styling */.login_form .login_option {display: flex;width: 100%;justify-content: space-between;align-items: center;}.login_form .login_option .option {width: calc(100% / 2 - 12px);}.login_form .login_option .option a {height: 56px;display: flex;justify-content: center;align-items: center;gap: 12px;background: #F8F8FB;border: 1px solid #DADAF2;border-radius: 5px;margin: 34px 0 24px 0;text-decoration: none;color: #171645;font-weight: 500;transition: 0.2s ease;}.login_form .login_option .option a:hover {background: #ededf5;border-color: #ff3c00;}.login_form .login_option .option a img {max-width: 25px;}.login_form p {text-align: center;font-weight: 500;}.login_form .separator {position: relative;margin-bottom: 24px;}/* Login option separator styling */.login_form .separator span {background: #fff;z-index: 1;padding: 0 10px;position: relative;}.login_form .separator::after {content: '';position: absolute;width: 100%;top: 50%;left: 0;height: 1px;background: #C2C2C2;display: block;}form .input_box label {display: block;font-weight: 500;margin-bottom: 8px;}/* Input field styling */form .input_box input {width: 100%;height: 57px;border: 1px solid #DADAF2;border-radius: 5px;outline: none;background: #F8F8FB;font-size: 17px;padding: 0px 20px;margin-bottom: 25px;transition: 0.2s ease;}form .input_box input:focus {border-color: #ff3c00;}form .input_box .password_title {display: flex;justify-content: space-between;text-align: center;}form .input_box {position: relative;}a {text-decoration: none;color: #ff3c00;font-weight: 500;}a:hover {text-decoration: underline;}/* Login button styling */form button {width: 100%;height: 56px;border-radius: 5px;border: none;outline: none;background: #ff3c00;color: #fff;font-size: 18px;font-weight: 500;text-transform: uppercase;cursor: pointer;margin-bottom: 28px;transition: 0.3s ease;}form button:hover {background: #ff3c00;}
Step 4: Test Your Login Form
Once you have added the HTML and CSS code, it’s time to see your work in action! Open index.html in your favorite web browser to view your project. If everything is set up correctly, you should see your stylish login form ready to use.
Read Also
- Glassmorphism Login Form in HTML and CSS
Explore the stylish world of glassmorphism as you create a modern login form using HTML and CSS. This guide breaks down the design process step by step. - Toggle Button using HTML, CSS, and JavaScript
Discover how to enhance user interaction by creating a sleek toggle button with HTML, CSS, and JavaScript. This tutorial covers everything from structure to styling. - Responsive Cards in HTML and CSS
Learn how to design eye-catching responsive cards that adapt seamlessly to any device. This guide offers practical tips for achieving stunning layouts. - Build a Google Gemini Chatbot Using HTML, CSS, and JS
Dive into chatbot development by creating a Google Gemini chatbot with HTML, CSS, and JavaScript. This tutorial will help you understand the basics of interactive forms.
Conclusion
Creating a Basic Login Form is a fantastic way for beginners to grasp the fundamentals of HTML and CSS while gaining practical experience in designing and styling web forms. By following the steps outlined in this guide, you’ve successfully built your Basic Login Form from scratch.
To further enhance your web development skills, consider exploring other attractive login and registration forms available online. Many of these examples utilize advanced features that can deepen your understanding of user interactions and enhance your projects.
If you encounter any challenges while building your Basic Login Form or wish to save time, feel free to download the source code for this project using the button below.
Feel free to download the complete source code for this project and start building!

