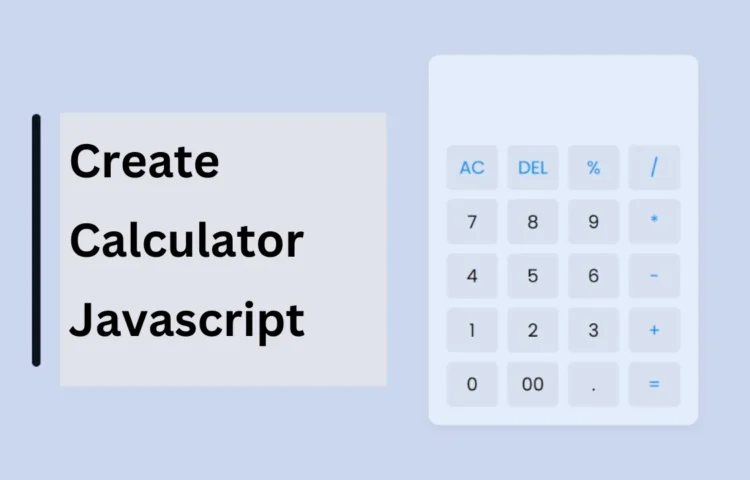
Build a Fully Functional Calculator with HTML, CSS, and JS as one of the best exercises for web developers. This project combines logic, design, and functionality, making it a fantastic way to sharpen your skills. In this blog post, we’ll guide you step-by-step through creating a responsive calculator using HTML, CSS, and JavaScript. This calculator will not only handle basic functions like addition, subtraction, multiplication, and division, but also more advanced operations, offering a hands-on experience perfect for improving your web development abilities.

Whether you’re new to web development or looking to refine your JavaScript skills, building this fully functional calculator with HTML, CSS, and JS is the perfect project to practice. It’s an ideal way to understand how HTML, CSS, and JavaScript work together in harmony to create interactive user interfaces and responsive web applications. Start learning today and enhance your development toolkit!

Steps to Build a Fully Functional Calculator with HTML, CSS, and JavaScript

To create this working calculator, follow these step-by-step instructions. Each step involves writing and structuring your HTML, styling it with CSS, and adding JavaScript to handle the operations.

  • Create a Folder: Start by creating a new folder for your project. Inside this folder, you’ll create all the necessary files.
  • Create index.html File: This file will contain the basic structure and layout of your calculator. It will include input fields, buttons for numbers and operations, and display areas.
  • Create style.css File: The style.css file will give your calculator a clean, responsive design. Use CSS to arrange buttons and text fields, adjust fonts, and colors, and ensure the calculator looks great on desktop and mobile devices.
  • Create script.js File: The script.js file will contain the JavaScript logic to make your calculator functional. This is where you’ll define the actions for each button click and handle the calculations.

Key Features of the Calculator

  • Basic Arithmetic Operations: The calculator will be able to perform basic operations like addition, subtraction, multiplication, and division.
  • Responsive Design: Thanks to CSS, your calculator will be fully responsive, ensuring it looks great on any screen size, from mobile to desktop.
  • Input Validation: To ensure smooth operations, the calculator won’t allow you to click on operation buttons (e.g., plus, minus) before selecting numbers.
    Detailed Code Structure

HTML Structure

Your index.html file will contain the essential structure for the calculator. It includes buttons for digits (0-9), operations (addition, subtraction, etc.), and a display area to show the input and result.

<!DOCTYPE html>
<html lang="en">
  <head>
    <meta charset="UTF-8" />
    <meta http-equiv="X-UA-Compatible" content="IE=edge" />
    <meta name="viewport" content="width=device-width, initial-scale=1.0" />
    <title>Calculator in HTML CSS & JavaScript</title>
    <link rel="stylesheet" href="style.css" />
  </head>
  <body>
    <div class="container">
      <input type="text" class="display" />
      <div class="buttons">
        <button class="operator" data-value="AC">AC</button>
        <button class="operator" data-value="DEL">DEL</button>
        <button class="operator" data-value="%">%</button>
        <button class="operator" data-value="/">/</button>
        <button data-value="7">7</button>
        <button data-value="8">8</button>
        <button data-value="9">9</button>
        <button class="operator" data-value="*">*</button>
        <button data-value="4">4</button>
        <button data-value="5">5</button>
        <button data-value="6">6</button>
        <button class="operator" data-value="-">-</button>
        <button data-value="1">1</button>
        <button data-value="2">2</button>
        <button data-value="3">3</button>
        <button class="operator" data-value="+">+</button>
        <button data-value="0">0</button>
        <button data-value="00">00</button>
        <button data-value=".">.</button>
        <button class="operator" data-value="=">=</button>
      </div>
    </div>
    <script src="script.js"></script>
  </body>
</html>

CSS Styling

In your style.css, you’ll style the calculator layout, arranging the buttons in a grid format and making the design responsive. You can experiment with colors, fonts, and spacing to achieve the desired look.

/* Import Google font - Poppins */
@import url("https://fonts.googleapis.com/css2?family=Poppins:wght@300;400;500;600;700&display=swap");
* {
  margin: 0;
  padding: 0;
  box-sizing: border-box;
  font-family: "Poppins", sans-serif;
}
body {
  height: 100vh;
  display: flex;
  align-items: center;
  justify-content: center;
  background: #e0e3eb;
}
.container {
  position: relative;
  max-width: 300px;
  width: 100%;
  border-radius: 12px;
  padding: 10px 20px 20px;
  background: #fff;
  box-shadow: 0 5px 10px rgba(0, 0, 0, 0.05);
}
.display {
  height: 80px;
  width: 100%;
  outline: none;
  border: none;
  text-align: right;
  margin-bottom: 10px;
  font-size: 25px;
  color: #000e1a;
  pointer-events: none;
}
.buttons {
  display: grid;
  grid-gap: 10px;
  grid-template-columns: repeat(4, 1fr);
}
.buttons button {
  padding: 10px;
  border-radius: 6px;
  border: none;
  font-size: 20px;
  cursor: pointer;
  background-color: #eee;
}
.buttons button:active {
  transform: scale(0.99);
}
.operator {
  color: #2f9fff;
}

JavaScript Functionality

Your script.js file will manage the functionality of the calculator. JavaScript will listen to user input, perform the necessary calculations, and update the display. You’ll write functions that execute when the user clicks buttons, handle input validation, and ensure the calculator operates correctly.

const display = document.querySelector(".display");
const buttons = document.querySelectorAll("button");
const specialChars = ["%", "*", "/", "-", "+", "="];
let output = "";
//Define function to calculate based on button clicked.
const calculate = (btnValue) => {
  display.focus();
  if (btnValue === "=" && output !== "") {
    //If output has '%', replace with '/100' before evaluating.
    output = eval(output.replace("%", "/100"));
  } else if (btnValue === "AC") {
    output = "";
  } else if (btnValue === "DEL") {
    //If DEL button is clicked, remove the last character from the output.
    output = output.toString().slice(0, -1);
  } else {
    //If output is empty and button is specialChars then return
    if (output === "" && specialChars.includes(btnValue)) return;
    output += btnValue;
  }
  display.value = output;
};
//Add event listener to buttons, call calculate() on click.
buttons.forEach((button) => {
  //Button click listener calls calculate() with dataset value as argument.
  button.addEventListener("click", (e) => calculate(e.target.dataset.value));
});

Troubleshooting and Support

If you face any difficulties while creating the calculator, don’t worry! You can always download the full source code by clicking the “Download Source Codebutton below. This will give you access to all the files and allow you to test the calculator directly in your browser.

Conclusion: Build Your Fully Functional Calculator

By following these steps, you can easily create a fully functional calculator application using web technologies like HTML, CSS, and JavaScript. This project not only enhances your web development skills but also provides valuable insights into creating interactive web applications.

Read Also

  1. Glassmorphism Login Form in HTML and CSS
    Explore the stylish world of glassmorphism as you create a modern login form using HTML and CSS. This guide breaks down the design process step by step.
  2. Toggle Button using HTML, CSS, and JavaScript
    Discover how to enhance user interaction by creating a sleek toggle button with HTML, CSS, and JavaScript. This tutorial covers everything from structure to styling.
  3. Responsive Cards in HTML and CSS
    Learn how to design eye-catching responsive cards that adapt seamlessly to any device. This guide offers practical tips for achieving stunning layouts.
  4. Build a Google Gemini Chatbot Using HTML, CSS, and JS
    Dive into chatbot development by creating a Google Gemini chatbot with HTML, CSS, and JavaScript. This tutorial will help you understand the basics of interactive forms.

Download the Source Code

To help you get started easily, you can download the complete source code for the calculator project by clicking the button below:

The sleek and familiar design of Netflix’s login page is one of the most well-known on the web. Have you ever thought to recreate this eye-catching interface, then you’re in the right place. In this guide, I’ll show you how to build a Netflix-inspired login page using HTML and CSS. Whether you’re a beginner or an intermediate developer, this project will help you improve your front-end skills while mimickingthe modern, user-friendly design of Netflix.

Why Build a Netflix-inspired Login Page?

For developers, recreating real-world projects is a fantastic way to practice. The Netflix-inspired login page is more than just an ordinary sign-in form—it has a clean, responsive design that works seamlessly across devices. By building this, you’ll learn how to position elements, style forms, and make a page responsive, all while mimicking a global platform’s aesthetic.

Let’s jump into the step-by-step process of building a Netflix-inspired login page.

Steps to Create a Netflix-inspired Login Page in HTML and CSS

1. Create Your Project Folder: Create a folder for your project. Inside this folder, create two files:

  • index.html (for HTML structure)
  • style.css (for styling)

You can also create an “Images” folder to add the Netflix logo or background images to the project.

2. Build the HTML Structure: In the index.html file, you’ll use semantic HTML to create the layout. Add the necessary elements such as a navigation bar, heading, form, input fields for username and password, and a “Sign In” button. Here’s an example of how your HTML might look:

 
<!DOCTYPE html>
 
<!-- Coding By Abhikesh - www.abhikesh.com -->
 
<html lang="en">
 
<head>
 
    <meta charset="UTF-8">
 
    <meta name="viewport" content="width=device-width, initial-scale=1.0">
 
    <title>Netflix Login Page | Abhikesh Kumar</title>
 
    <link rel="stylesheet" href="style.css">
 
</head>
 
<body>
 
    <nav>
 
        <a href="#"><img src="images/logo.svg" alt="logo"></a>
 
    </nav>
 
    <div class="form-wrapper">
 
        <h2>Sign In</h2>
 
        <form action="#">
 
            <div class="form-control">
 
                <input type="text" required>
 
                <label>Email or phone number</label>
 
            </div>
 
            <div class="form-control">
 
                <input type="password" required>
 
                <label>Password</label>
 
            </div>
 
            <button type="submit">Sign In</button>
 
            <divclass="form-help">
 
                <div class="remember-me">
 
                    <input type="checkbox" id="remember-me">
 
                    <label for="remember-me">Remember me</label>
 
                </div>
 
                <a href="#">Need help?</a>
 
            </div>
 
        </form>
 
        <p>New to Netflix? <a href="#">Sign up now</a></p>
 
        <small>
 
            This page is protected by Google reCAPTCHA to ensure you're not a bot.
 
            <a href="#">Learn more.</a>
 
        </small>
 
    </div>
 
</body>
 
</html>


3. Style the Page with CSS: In your style.css file, style the elements to match Netflix’s minimalist look. You’ll focus on fonts, spacing, and responsiveness to ensure the page looks good on all devices. Here’s some basic CSS for the login page:

 
@import url("https://fonts.googleapis.com/css2?family=Roboto:wght@400;500;600;700&display=swap");
 
* {
 
    margin: 0;
 
    padding: 0;
 
    box-sizing: border-box;
 
    font-family: 'Roboto', sans-serif;
 
}
 
body {
 
    background: #000;
 
}
 
body::before {
 
    content: "";
 
    position: absolute;
 
    left: 0;
 
    top: 0;
 
    opacity: 0.5;
 
    width: 100%;
 
    height: 100%;
 
    background: url("images/hero-img.jpg");
 
    background-position: center;
 
}
 
nav {
 
    position: fixed;
 
    padding: 25px 60px;
 
    z-index: 1;
 
}
 
nav a img {
 
    width: 167px;
 
}
 
.form-wrapper {
 
    position: absolute;
 
    left: 50%;
 
    top: 50%;
 
    border-radius: 4px;
 
    padding: 70px;
 
    width: 450px;
 
    transform: translate(-50%, -50%);
 
    background: rgba(0, 0, 0, .75);
 
}
 
.form-wrapper h2 {
 
    color: #fff;
 
    font-size: 2rem;
 
}
 
.form-wrapper form {
 
    margin: 25px 0 65px;
 
}
 
form .form-control {
 
    height: 50px;
 
    position: relative;
 
    margin-bottom: 16px;
 
}
 
.form-control input {
 
    height: 100%;
 
    width: 100%;
 
    background: #333;
 
    border: none;
 
    outline: none;
 
    border-radius: 4px;
 
    color: #fff;
 
    font-size: 1rem;
 
    padding: 0 20px;
 
}
 
.form-control input:is(:focus, :valid) {
 
    background: #444;
 
    padding: 16px 20px 0;
 
}
 
.form-control label {
 
    position: absolute;
 
    left: 20px;
 
    top: 50%;
 
    transform: translateY(-50%);
 
    font-size: 1rem;
 
    pointer-events: none;
 
    color: #8c8c8c;
 
    transition: all 0.1s ease;
 
}
 
.form-control input:is(:focus, :valid)~label {
 
    font-size: 0.75rem;
 
    transform: translateY(-130%);
 
}
 
form button {
 
    width: 100%;
 
    padding: 16px 0;
 
    font-size: 1rem;
 
    background: #e50914;
 
    color: #fff;
 
    font-weight: 500;
 
    border-radius: 4px;
 
    border: none;
 
    outline: none;
 
    margin: 25px 0 10px;
 
    cursor: pointer;
 
    transition: 0.1s ease;
 
}
 
form button:hover {
 
    background: #c40812;
 
}
 
.form-wrapper a {
 
    text-decoration: none;
 
}
 
.form-wrapper a:hover {
 
    text-decoration: underline;
 
}
 
.form-wrapper :where(label, p, small, a) {
 
    color: #b3b3b3;
 
}
 
form .form-help {
 
    display: flex;
 
    justify-content: space-between;
 
}
 
form .remember-me {
 
    display: flex;
 
}
 
form .remember-me input {
 
    margin-right: 5px;
 
    accent-color: #b3b3b3;
 
}
 
form .form-help :where(label, a) {
 
    font-size: 0.9rem;
 
}
 
.form-wrapper p a {
 
    color: #fff;
 
}
 
.form-wrapper small {
 
    display: block;
 
    margin-top: 15px;
 
    color: #b3b3b3;
 
}
 
.form-wrapper small a {
 
    color: #0071eb;
 
}
 
@media (max-width: 740px) {
 
    body::before {
 
        display: none;
 
    }
 
    nav, .form-wrapper {
 
        padding: 20px;
 
    }
 
    nav a img {
 
        width: 140px;
 
    }
 
    .form-wrapper {
 
        width: 100%;
 
        top: 43%;
 
    }
 
    .form-wrapper form {
 
        margin: 25px 0 40px;
 
    }
 
}


Key Learning Points

  • Form Design: You’ll understand how to create a clean and user-friendly login form, focusing on accessibility and responsiveness.
  • CSS Flexbox: You’ll use Flexbox to center the form on the screen, making it responsive and ensuring it looks good on all devices.
  • Styling and Design: You’ll match the Netflix aesthetic, learning how to incorporate background images, colors, and minimalistic design elements that enhance the user experience.

Conclusion and Final Words

Building a Netflix-inspired login page using only HTML and CSS is a great project for both beginners and seasoned developers. It allows you to explore crucial aspects of web development like form creation, styling, and making responsive designs. Projects like this help hone your front-end development skills, improve your understanding of CSS, and build your portfolio.

Once you’ve mastered this, you can take it a step further by adding additional features like floating labels, password toggle options, or even basic JavaScript form validation to make your project more dynamic.

If you encounter any issues while building your Netflix login page, don’t worry! You can download the source code for this project by clicking the “Download” button below.

Download Source Code

Ready to get started? Click the button below to download the source code for the Netflix login page and start your project today.

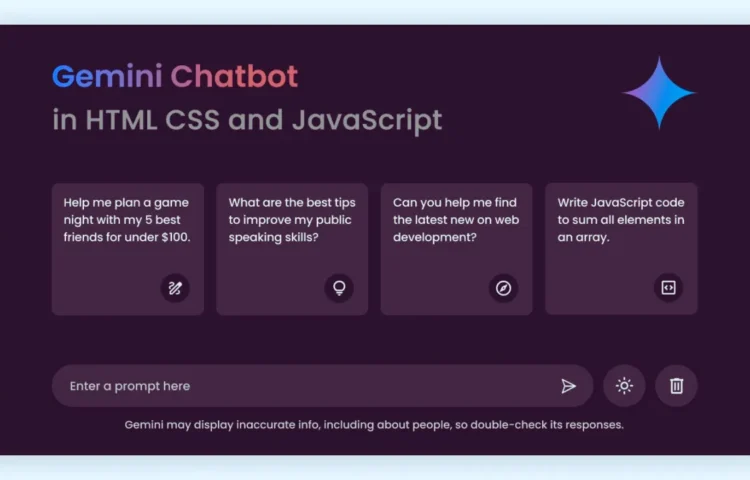
In today’s world, AI chatbots like Google Gemini and ChatGPT are changing how we interact with technology. They provide more human-like conversations and smarter responses. Have you ever thought about creating your own chatbot similar to Google Gemini? The good news is, that with HTML, CSS, and JavaScript, you can build a chatbot interface that mimics Gemini’s conversational style.

Google Gemini is a smart AI chatbot created by Google, much like ChatGPT. It uses artificial intelligence to generate natural, human-like responses, making interactions feel smoother and easier. While building an AI model like Google Gemini involves complex machine learning, you can create a simpler version of the chatbot interface using basic web development tools. This tutorial will show you how to build a fully functional chatbot interface with HTML, CSS, and JavaScript.

Why Build a Chatbot Interface?

Building a chatbot interface like Gemini provides valuable experience in web development, user interface (UI) design, and API integration. By following this tutorial, you’ll learn how to structure a dynamic chatbot layout, style it with CSS, and make it interactive with JavaScript.

Additionally, the chatbot we’ll create will support essential features like:

  • Sending and receiving messages
  • Toggling between light and dark themes
  • Saving chat history and user preferences in local storage

This project will help you level up your front-end development skills and give you a foundation for building more advanced web applications in the future.

Steps to Build a Google Gemini Chatbot Clone

Step 1: Setting Up Your Project Folder

To start, create a new folder for your project. You can name it something like gemini-chatbot. Inside this folder, you will need the following three files:

  • index.html – This will contain the HTML structure of your chatbot interface.
  • style.css – This file will handle the styling of the chatbot, giving it a sleek, responsive design.
  • script.js – Here, you’ll write the JavaScript code that makes the chatbot interactive.

You can also download and include images, such as logos or background graphics, to make the chatbot interface more appealing.

Step 2: Structuring the HTML (index.html)

The HTML file is responsible for the layout and structure of your chatbot. Start by creating the basic framework for your chatbot interface, which will include the following sections:

  • A header – This will display the chatbot name and theme toggle button (light/dark).
  • A chat area – This section will hold the conversation bubbles and display messages.
  • An input area – At the bottom of the page, you’ll have a text input box where users can type their messages and a button to send them.

Make sure to use semantic HTML tags for better accessibility and readability. Here you can understand the structure through this example in a simplified way:

 
<!DOCTYPE html>
<!-- Coding By Abhikesh - www.abhikesh.com -->
<html lang="en">
<head>
  <meta charset="UTF-8">
  <meta name="viewport" content="width=device-width, initial-scale=1.0">
  <title>Gemini Chatbot | Abhikesh Kumar</title>
  <!-- Linking Google Fonts For Icons -->
  <link rel="stylesheet" href="https://fonts.googleapis.com/css2?family=Material+Symbols+Rounded:opsz,wght,FILL,GRAD@24,400,0,0" />
  <link rel="stylesheet" href="style.css">
</head>
<body>
  <header class="header">
    <!-- Header Greetings -->
    <h1 class="title">Hello, there</h1>
    <p class="subtitle">How can I help you today?</p>
    <!-- Suggestion list -->
    <ul class="suggestion-list">
      <li class="suggestion">
        <h4 class="text">Help me plan a game night with my 5 best friends for under $100.</h4>
        <span class="icon material-symbols-rounded">draw</span>
      </li>
      <li class="suggestion">
        <h4 class="text">What are the best tips to improve my public speaking skills?</h4>
        <span class="icon material-symbols-rounded">lightbulb</span>
      </li>
      <li class="suggestion">
        <h4 class="text">Can you help me find the latest news on web development?</h4>
        <span class="icon material-symbols-rounded">explore</span>
      </li>
      <li class="suggestion">
        <h4 class="text">Write JavaScript code to sum all elements in an array.</h4>
        <span class="icon material-symbols-rounded">code</span>
      </li>
    </ul>
  </header>
  <!-- Chat List / Container -->
  <div class="chat-list"></div>
  <!-- Typing Area -->
  <div class="typing-area">
    <form action="#" class="typing-form">
      <div class="input-wrapper">
        <input type="text" placeholder="Enter a prompt here" class="typing-input" required />
        <button id="send-message-button" class="icon material-symbols-rounded">send</button>
      </div>
      <div class="action-buttons">
        <span id="theme-toggle-button" class="icon material-symbols-rounded">light_mode</span>
        <span id="delete-chat-button" class="icon material-symbols-rounded">delete</span>
      </div>
    </form>
    <p class="disclaimer-text">
      Gemini may display inaccurate info, including about people, so double-check its responses.
    </p>
  </div>
  <script src="script.js"></script>
</body>
</html>
 

Step 3: Styling with CSS (style.css)

Now that your HTML structure is ready, it’s time to make it visually appealing with CSS. The style file will control the layout, colors, font styles, and responsiveness of your chatbot.

Focus on creating a minimalist and modern look, similar to Google’s Gemini chatbot. You can add a light and dark theme toggle by using CSS variables for colors and switching them based on the user’s selection.

For example

 
/* Import Google Font - Poppins */
@import url('https://fonts.googleapis.com/css2?family=Poppins:wght@400;500;600&display=swap');
* {
  margin: 0;
  padding: 0;
  box-sizing: border-box;
  font-family: "Poppins", sans-serif;
}
:root {
  /* Dark mode colors */
  --text-color: #E3E3E3;
  --subheading-color: #828282;
  --placeholder-color: #A6A6A6;
  --primary-color: #242424;
  --secondary-color: #383838;
  --secondary-hover-color: #444;
}
.light_mode {
  /* Light mode colors */
  --text-color: #222;
  --subheading-color: #A0A0A0;
  --placeholder-color: #6C6C6C;
  --primary-color: #FFF;
  --secondary-color: #E9EEF6;
  --secondary-hover-color: #DBE1EA;
}
body {
  background: var(--primary-color);
}
.header, .chat-list .message, .typing-form {
  margin: 0 auto;
  max-width: 980px;
}
.header {
  margin-top: 6vh;
  padding: 1rem;
  overflow-x: hidden;
}
body.hide-header .header {
  margin: 0;
  display: none;
}
.header :where(.title, .subtitle) {
  color: var(--text-color);
  font-weight: 500;
  line-height: 4rem;
}
.header .title {
  width: fit-content;
  font-size: 3rem;
  background-clip: text;
  background: linear-gradient(to right, #4285f4, #d96570);
  -webkit-background-clip: text;
  -webkit-text-fill-color: transparent;
}
.header .subtitle {
  font-size: 2.6rem;
  color: var(--subheading-color);
}
.suggestion-list {
  width: 100%;
  list-style: none;
  display: flex;
  gap: 1.25rem;
  margin-top: 9.5vh;
  overflow: hidden;
  overflow-x: auto;
  scroll-snap-type: x mandatory;
  scrollbar-width: none;
}
.suggestion-list .suggestion {
  cursor: pointer;
  padding: 1.25rem;
  width: 222px;
  flex-shrink: 0;
  display: flex;
  flex-direction: column;
  align-items: flex-end;
  border-radius: 0.75rem;
  justify-content: space-between;
  background: var(--secondary-color);
  transition: 0.2s ease;
}
.suggestion-list .suggestion:hover {
  background: var(--secondary-hover-color);
}
.suggestion-list .suggestion :where(.text, .icon) {
  font-weight: 400;
  color: var(--text-color);
}
.suggestion-list .suggestion .icon {
  width: 42px;
  height: 42px;
  display: flex;
  font-size: 1.3rem;
  margin-top: 2.5rem;
  align-self: flex-end;
  align-items: center;
  border-radius: 50%;
  justify-content: center;
  color: var(--text-color);
  background: var(--primary-color);
}
.chat-list {
  padding: 2rem 1rem 12rem;
  max-height: 100vh;
  overflow-y: auto;
  scrollbar-color: #999 transparent;
}
.chat-list .message.incoming {
  margin-top: 1.5rem;
}
.chat-list .message .message-content {
  display: flex;
  gap: 1.5rem;
  width: 100%;
  align-items: center;
}
.chat-list .message .text {
  color: var(--text-color);
  white-space: pre-wrap;
}
.chat-list .message.error .text {
  color: #e55865;
}
.chat-list .message.loading .text {
  display: none;
}
.chat-list .message .avatar {
  width: 40px;
  height: 40px;
  object-fit: cover;
  border-radius: 50%;
  align-self: flex-start;
}
.chat-list .message.loading .avatar {
  animation: rotate 3s linear infinite;
}
@keyframes rotate {
  100% {
    transform: rotate(360deg);
  }
}
.chat-list .message .icon {
  color: var(--text-color);
  cursor: pointer;
  height: 35px;
  width: 35px;
  border-radius: 50%;
  display: flex;
  align-items: center;
  justify-content: center;
  background: none;
  font-size: 1.25rem;
  margin-left: 3.5rem;
  visibility: hidden;
}
.chat-list .message .icon.hide {
  visibility: hidden;
}
.chat-list .message:not(.loading, .error):hover .icon:not(.hide){
  visibility: visible;
}
.chat-list .message .icon:hover {
  background: var(--secondary-hover-color);
}
.chat-list .message .loading-indicator {
  display: none;
  gap: 0.8rem;
  width: 100%;
  flex-direction: column;
}
.chat-list .message.loading .loading-indicator {
  display: flex;
}
.chat-list .message .loading-indicator .loading-bar {
  height: 11px;
  width: 100%;
  border-radius: 0.135rem;
  background-position: -800px 0;
  background: linear-gradient(to right, #4285f4, var(--primary-color), #4285f4);
  animation: loading 3s linear infinite;
}
.chat-list .message .loading-indicator .loading-bar:last-child {
  width: 70%;
}
@keyframes loading {
  0% {
    background-position: -800px 0;
  }
  100% {
    background-position: 800px 0;
  }
}
.typing-area {
  position: fixed;
  width: 100%;
  left: 0;
  bottom: 0;
  padding: 1rem;
  background: var(--primary-color);
}
.typing-area :where(.typing-form, .action-buttons) {
  display: flex;
  gap: 0.75rem;
}
.typing-form .input-wrapper {
  width: 100%;
  height: 56px;
  display: flex;
  position: relative;
}
.typing-form .typing-input {
  height: 100%;
  width: 100%;
  border: none;
  outline: none;
  resize: none;
  font-size: 1rem;
  color: var(--text-color);
  padding: 1.1rem 4rem 1.1rem 1.5rem;
  border-radius: 100px;
  background: var(--secondary-color);
}
.typing-form .typing-input:focus {
  background: var(--secondary-hover-color);
}
.typing-form .typing-input::placeholder {
  color: var(--placeholder-color);
}
.typing-area .icon {
  width: 56px;
  height: 56px;
  flex-shrink: 0;
  cursor: pointer;
  border-radius: 50%;
  display: flex;
  font-size: 1.4rem;
  color: var(--text-color);
  align-items: center;
  justify-content: center;
  background: var(--secondary-color);
  transition: 0.2s ease;
}
.typing-area .icon:hover {
  background: var(--secondary-hover-color);
}
.typing-form #send-message-button {
  position: absolute;
  right: 0;
  outline: none;
  border: none;
  transform: scale(0);
  background: transparent;
  transition: transform 0.2s ease;
}
.typing-form .typing-input:valid ~ #send-message-button {
  transform: scale(1);
}
.typing-area .disclaimer-text {
  text-align: center;
  font-size: 0.85rem;
  margin-top: 1rem;
  color: var(--placeholder-color);
}
/* Responsive media query code for small screen */
@media (max-width: 768px) {
  .header :is(.title, .subtitle) {
    font-size: 2rem;
    line-height: 2.6rem;
  }
  .header .subtitle {
    font-size: 1.7rem;
  }
  .typing-area :where(.typing-form, .action-buttons) {
    gap: 0.4rem;
  }
  .typing-form .input-wrapper {
    height: 50px;
  }
  .typing-form .typing-input {
    padding: 1.1rem 3.5rem 1.1rem 1.2rem;
  }
  .typing-area .icon {
    height: 50px;
    width: 50px;
  }
  .typing-area .disclaimer-text {
    font-size: 0.75rem;
    margin-top: 0.5rem;
  }
}
 

Step 4: Adding Interactivity with JavaScript (script.js)

The final step is adding interactivity using JavaScript. This involves sending messages, toggling between themes, and storing chat history in the browser’s local storage.

Your chatbot will need functions to:

  • Send messages – Capture the text from the input field and display it in the chat area.
  • Toggle themes – Switch between light and dark themes by adding/removing the dark-theme class.
  • Store chat history – Save the chat history in local Storage so it persists even after a page refresh.

Here’s a basic implementation of these features in JavaScript:

 
const typingForm = document.querySelector(".typing-form");
const chatContainer = document.querySelector(".chat-list");
const suggestions = document.querySelectorAll(".suggestion");
const toggleThemeButton = document.querySelector("#theme-toggle-button");
const deleteChatButton = document.querySelector("#delete-chat-button");
// State variables
let userMessage = null;
let isResponseGenerating = false;
// API configuration
const API_KEY = "PASTE-YOUR-API-KEY"; // Your API key here
const API_URL = `https://generativelanguage.googleapis.com/v1/models/gemini-pro:generateContent?key=${API_KEY}`;
// Load theme and chat data from local storage on page load
const loadDataFromLocalstorage = () => {
  const savedChats = localStorage.getItem("saved-chats");
  const isLightMode = (localStorage.getItem("themeColor") === "light_mode");
  // Apply the stored theme
  document.body.classList.toggle("light_mode", isLightMode);
  toggleThemeButton.innerText = isLightMode ? "dark_mode" : "light_mode";
  // Restore saved chats or clear the chat container
  chatContainer.innerHTML = savedChats || '';
  document.body.classList.toggle("hide-header", savedChats);
  chatContainer.scrollTo(0, chatContainer.scrollHeight); // Scroll to the bottom
}
// Create a new message element and return it
const createMessageElement = (content, ...classes) => {
  const div = document.createElement("div");
  div.classList.add("message", ...classes);
  div.innerHTML = content;
  return div;
}
// Show typing effect by displaying words one by one
const showTypingEffect = (text, textElement, incomingMessageDiv) => {
  const words = text.split(' ');
  let currentWordIndex = 0;
  const typingInterval = setInterval(() => {
    // Append each word to the text element with a space
    textElement.innerText += (currentWordIndex === 0 ? '' : ' ') + words[currentWordIndex++];
    incomingMessageDiv.querySelector(".icon").classList.add("hide");
    // If all words are displayed
    if (currentWordIndex === words.length) {
      clearInterval(typingInterval);
      isResponseGenerating = false;
      incomingMessageDiv.querySelector(".icon").classList.remove("hide");
      localStorage.setItem("saved-chats", chatContainer.innerHTML); // Save chats to local storage
    }
    chatContainer.scrollTo(0, chatContainer.scrollHeight); // Scroll to the bottom
  }, 75);
}
// Fetch response from the API based on user message
const generateAPIResponse = async (incomingMessageDiv) => {
  const textElement = incomingMessageDiv.querySelector(".text"); // Getting text element
  try {
    // Send a POST request to the API with the user's message
    const response = await fetch(API_URL, {
      method: "POST",
      headers: { "Content-Type": "application/json" },
      body: JSON.stringify({
        contents: [{
          role: "user",
          parts: [{ text: userMessage }]
        }]
      }),
    });
    const data = await response.json();
    if (!response.ok) throw new Error(data.error.message);
    // Get the API response text and remove asterisks from it
    const apiResponse = data?.candidates[0].content.parts[0].text.replace(/\*\*(.*?)\*\*/g, '$1');
    showTypingEffect(apiResponse, textElement, incomingMessageDiv); // Show typing effect
  } catch (error) { // Handle error
    isResponseGenerating = false;
    textElement.innerText = error.message;
    textElement.parentElement.closest(".message").classList.add("error");
  } finally {
    incomingMessageDiv.classList.remove("loading");
  }
}
// Show a loading animation while waiting for the API response
const showLoadingAnimation = () => {
  const html = `<div class="message-content">
                  <img class="avatar" src="images/gemini.svg" alt="Gemini avatar">
                  <p class="text"></p>
                  <div class="loading-indicator">
                    <div class="loading-bar"></div>
                    <div class="loading-bar"></div>
                    <div class="loading-bar"></div>
                  </div>
                </div>
                <span onClick="copyMessage(this)" class="icon material-symbols-rounded">content_copy</span>`;
  const incomingMessageDiv = createMessageElement(html, "incoming", "loading");
  chatContainer.appendChild(incomingMessageDiv);
  chatContainer.scrollTo(0, chatContainer.scrollHeight); // Scroll to the bottom
  generateAPIResponse(incomingMessageDiv);
}
// Copy message text to the clipboard
const copyMessage = (copyButton) => {
  const messageText = copyButton.parentElement.querySelector(".text").innerText;
  navigator.clipboard.writeText(messageText);
  copyButton.innerText = "done"; // Show confirmation icon
  setTimeout(() => copyButton.innerText = "content_copy", 1000); // Revert icon after 1 second
}
// Handle sending outgoing chat messages
const handleOutgoingChat = () => {
  userMessage = typingForm.querySelector(".typing-input").value.trim() || userMessage;
  if(!userMessage || isResponseGenerating) return; // Exit if there is no message or response is generating
  isResponseGenerating = true;
  const html = `<div class="message-content">
                  <img class="avatar" src="images/user.jpg" alt="User avatar">
                  <p class="text"></p>
                </div>`;
  const outgoingMessageDiv = createMessageElement(html, "outgoing");
  outgoingMessageDiv.querySelector(".text").innerText = userMessage;
  chatContainer.appendChild(outgoingMessageDiv);
  typingForm.reset(); // Clear input field
  document.body.classList.add("hide-header");
  chatContainer.scrollTo(0, chatContainer.scrollHeight); // Scroll to the bottom
  setTimeout(showLoadingAnimation, 500); // Show loading animation after a delay
}
// Toggle between light and dark themes
toggleThemeButton.addEventListener("click", () => {
  const isLightMode = document.body.classList.toggle("light_mode");
  localStorage.setItem("themeColor", isLightMode ? "light_mode" : "dark_mode");
  toggleThemeButton.innerText = isLightMode ? "dark_mode" : "light_mode";
});
// Delete all chats from local storage when button is clicked
deleteChatButton.addEventListener("click", () => {
  if (confirm("Are you sure you want to delete all the chats?")) {
    localStorage.removeItem("saved-chats");
    loadDataFromLocalstorage();
  }
});
// Set userMessage and handle outgoing chat when a suggestion is clicked
suggestions.forEach(suggestion => {
  suggestion.addEventListener("click", () => {
    userMessage = suggestion.querySelector(".text").innerText;
    handleOutgoingChat();
  });
});
// Prevent default form submission and handle outgoing chat
typingForm.addEventListener("submit", (e) => {
  e.preventDefault();
  handleOutgoingChat();
});
loadDataFromLocalstorage();
 

Conclusion and Final Words

You’ve successfully built a Google Gemini chatbot interface using HTML, CSS, and JavaScript. This project is an excellent way to sharpen your front-end development skills, as it incorporates responsive design, theme switching, and local storage management. You’ve also learned the process of creating an interactive web application that mimics real-world chatbots.

This chatbot interface can be further enhanced by integrating an AI-powered API to generate intelligent responses, just like the actual Google Gemini chatbot.

If you encounter any challenges while building your chatbot or need further assistance, feel free to download the source code files for this project by clicking the “Download” button below.

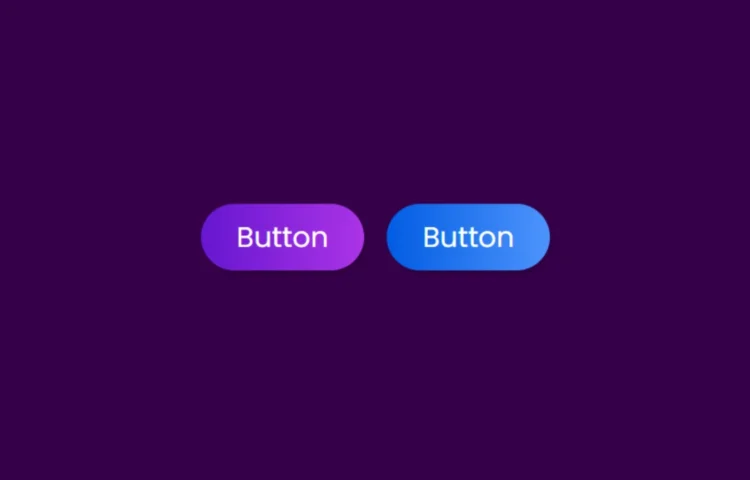
In today’s web development world, enhancing user experience with subtle animations can make a big difference. One popular interactive effect is the Button Ripple Animation, which provides immediate feedback to users when they click on a button. This tutorial will walk you through creating a smooth ripple animation using HTML, CSS, and JavaScript. Whether new to web development or looking to polish your existing skills, this tutorial will help you build a polished, professional-looking button animation.

Why Button Ripple Animation?

Button ripple animations create a visual confirmation that a button has been clicked. This effect starts from the point where the user clicks and expands outward like a ripple, making the interface feel more responsive and interactive. It’s a common technique used in material design and across modern websites and applications.

In this post, we’ll:

  • Explore the steps to create a Button Ripple Animation from scratch.
  • Walk through the HTML, CSS, and JavaScript code to build this animation.
  • Provide the full source code at the end for easy download.

Let’s dive into how you can create this eye-catching effect.

Understanding the Button Ripple Animation

When a button is clicked, a ripple effect appears starting from the point of the click and expands outward. This effect is created using a combination of CSS animations and JavaScript for interaction. In essence, a hidden element (a circle or “ripple”) is dynamically added to the button when it’s clicked, and its size and position are adjusted based on where the user clicked.

Key Benefits of Adding Ripple Animations:

  • User Feedback: Provides visual feedback, improving user experience.
  • Modern Look: Adds a contemporary, sleek feel to your buttons.
  • Enhanced Interaction: This makes your interface feel more responsive and interactive.

Step-by-Step: Building the Button Ripple Animation

Follow the steps below to build your button ripple effect:

1. Setting Up the Project Files

First, create a folder for your project, and inside the folder, create two files:

  • index.html: The main HTML file.
  • style.css: The stylesheet for styling the button and animation.

2. Writing the HTML Code

In the index.html file, create the basic structure of the webpage and the button that will display the ripple effect. Here’s the HTML code:

<!DOCTYPE html>
<!-- Coding By Abhikesh - abhikesh.com -->
<html lang="en" dir="ltr">
  <head>
    <meta charset="UTF-8">
    <title> Button Ripple Effect | CodingLab </title>
    <link rel="stylesheet" href="style.css">
   </head>
<body>
  <div class="buttons">
    <a class="button"href="#">Button</a>
    <a class="button two" href="#">Button</a>
  </div>
  <script>
  // Ripple Effect JavaScript Code
  let buttons = document.querySelectorAll(".button");
  for (var i = 0; i < buttons.length; i++) {
    buttons[i].addEventListener("click", (e)=>{
      e.preventDefault(); // preventing form submitting
      let overlay = document.createElement('span'); //creating a tag(span)
      overlay.classList.add("overlay"); //adding a class inside the span
      e.target.appendChild(overlay); //adding overlay tag inside the anchor tag at in HTML
      let xValue = e.clientX - e.target.offsetLeft; //by this we get perfect value where we will click
      let yValue = e.clientY - e.target.offsetTop; //by this we get perfect value where we will click
       overlay.style.left = xValue + "px"; //changing the position of the overlay according to our clicks on the button
       overlay.style.top = yValue + "px"; //changing the position of the overlay according to our clicks on the button
  });
  }
  </script>
</body>
</html>

In this HTML structure, we have a simple button that will trigger the ripple animation upon being clicked. We’re also using a bit of JavaScript to calculate the position of the click.

3. Writing the CSS Code

Now, move on to the style.css file to style the button and create the ripple animation. Below is the CSS code to make the button look good and animate the ripple:

/* Google Font Link */
@import url('https://fonts.googleapis.com/css2?family=Poppins:wght@200;300;400;500;600;700&display=swap');
*{
  margin: 0;
  padding: 0;
  box-sizing: border-box;
  font-family: "Poppins" , sans-serif;
}
body{
  height: 100vh;
  display: flex;
  align-items: center;
  justify-content: center;
  background: #350048;
}
.buttons .button{
  position: relative;
  display: inline-block;
  color: #fff;
  padding: 12px 38px;
  background: linear-gradient(90deg, #6616d0, #ac34e7);
  border-radius: 45px;
  margin: 10px;
  font-size: 30px;
  font-weight: 400;
  text-decoration: none;
  box-shadow: 3px 5px rgba(0, 0, 0, 0.1);
  border-top: 1px solid rgba(0,0,0,0.1);
  overflow: hidden;
}
.buttons .button.two{
  background: linear-gradient(90deg, #025ce3, #4e94fd);
}
.buttons .button .overlay{
  position: absolute;
  background: #fff;
  top: 0;
  left: 0;
  transform: translate(-50%,-50%);
  border-radius: 50%;
  animation: blink 0.5s linear;
}
@keyframes blink {
  0%{
    height: 0px;
    width: 0px;
    opacity: 0.3;
  }
  100%{
    height: 400px;
    width: 400px;
    opacity: 0;
  }
}

In this CSS code:

  • .ripple-button: This class styles the button with padding, and a gradient background, and removes any borders.
  • .ripple: This class defines the animated ripple effect that appears when the button is clicked. The ripple expands using a scaling animation (transform: scale()).
  • @keyframes ripple-effect: This keyframe defines the animation for the ripple, which scales it up and fades it

JavaScript Explanation

In the script block within the HTML, we add a click event listener to each button. When the button is clicked, a new span element (representing the ripple) is created and positioned at the exact point where the user clicked. The ripple class is applied to animate the effect, and after the animation is complete (600ms), the ripple element is removed from the DOM to prevent clutter.

Additional Tips and Customizations

  • Customizing Colors: You can easily adjust the gradient background of the button or the color of the ripple effect to match your website’s theme.
  • Animation Duration: If you want the ripple to last longer, simply increase the animation duration in the CSS.
  • Button Sizes: The button can be resized or given different styles like rounded corners or shadows to suit your design needs.
Want to Check Username Availability on Social Media?If you’re looking to check username availability on various social media platforms, visit NameChkr to find out!
Read Also

  1. Glassmorphism Login Form in HTML and CSS
    Explore the stylish world of glassmorphism as you create a modern login form using HTML and CSS. This guide breaks down the design process step by step.
  2. Toggle Button using HTML, CSS, and JavaScript
    Discover how to enhance user interaction by creating a sleek toggle button with HTML, CSS, and JavaScript. This tutorial covers everything from structure to styling.
  3. Responsive Cards in HTML and CSS
    Learn how to design eye-catching responsive cards that adapt seamlessly to any device. This guide offers practical tips for achieving stunning layouts.
  4. Build a Google Gemini Chatbot Using HTML, CSS, and JS
    Dive into chatbot development by creating a Google Gemini chatbot with HTML, CSS, and JavaScript. This tutorial will help you understand the basics of interactive forms.

Conclusion

Creating a Button Ripple Animation using HTML, CSS, and JavaScript is a fun and straightforward way to enhance the interactivity of your website. This animation is widely used across modern websites and apps, adding a professional touch to any interface.

By following this tutorial, you’ll not only create a beautiful ripple animation but also deepen your understanding of CSS animations and JavaScript DOM manipulation. The flexibility of this technique allows you to easily customize it for different styles and effects.

Download the Source Code
If you want to experiment further or need a quick start, you can download the complete source code for this button ripple animation. Click the button below to download all the files:

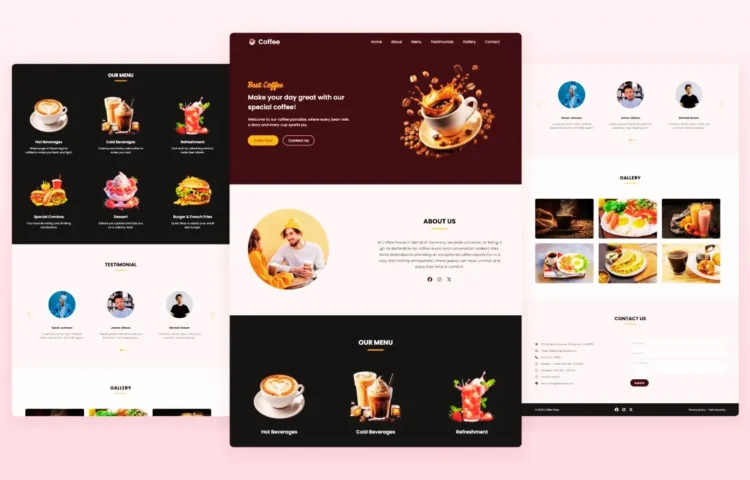
Creating a responsive coffee website in HTML, CSS, and JavaScript is a rewarding and creative journey, especially for those new to web development. This project allows you to dive into essential coding skills while building a professional and stylish site to showcase your work.

In this blog post, we’ll guide you through constructing a fully responsive, coffee-themed website using only HTML, CSS, and JavaScript. The site will feature key sections such as Home, About, Menu, Testimonials, Gallery, Contact, and a Footer. It will not only be visually appealing but also function seamlessly across all devices, from mobile to desktop.

One standout feature we’ll implement is a slider for the Testimonials section, adding a dynamic touch to customer reviews. We’ll also include a hamburger menu on mobile devices to enhance navigation.

This project is perfect for beginners in web development looking to sharpen their front-end coding skills. Let’s get started!

Key Sections of the Coffee Website

Here’s a breakdown of the sections you’ll be creating for your responsive coffee website:

  • Hero Section: The homepage welcoming visitors with an eye-catching introduction to your coffee shop and navigation menu.
  • About Section: Share your coffee shop’s history, values, and mission.
  • Menu Section: Display the coffee and food options available, enticing your visitors with your offerings.
  • Testimonials Section: A slider showcasing customer reviews, adding credibility to your coffee shop.
  • Gallery Section: Feature images of your coffee shop’s ambiance and delicious offerings.
  • Contact Section: Include a form or contact details for visitors to get in touch with you easily.
  • Footer Section: Provide additional information like social media links and extra navigation options.

Steps to Create a Responsive Coffee Website
Follow these steps to create a responsive coffee website using HTML, CSS, and JavaScript:

1. Set up your project folder: Create a folder for your website, naming it something like coffee-website.

2. Create the necessary files: Inside your project folder, create the following files:

  • index.html: Your main HTML file.
  • style.css: Your CSS file for styling.
  • script.js: Your JavaScript file for interactivity.

3. Download images: Add an “Images” folder to your project directory, containing all the necessary photos for your website.

4. Write the HTML code: Begin by adding the necessary HTML structure to your index.html file. Use semantic HTML tags like <header>, <nav>, <ul>, <li>, <a>, <section>, and <footer> to create a clean and structured layout.

<!DOCTYPE html>
 
<!-- Coding by abhikesh - www.abhikesh.com -->
 
<html lang="en">
 
  <head>
 
    <meta charset="UTF-8" />
 
    <meta name="viewport" content="width=device-width, initial-scale=1.0" />
 
    <title>Coffee Website | abhikesh</title>
 
    <!-- Linking Font Awesome for icons -->
 
    <link rel="stylesheet" href="https://cdnjs.cloudflare.com/ajax/libs/font-awesome/6.6.0/css/all.min.css" />
 
    <!-- Linking Swiper CSS -->
 
    <link rel="stylesheet" href="https://cdn.jsdelivr.net/npm/swiper@11/swiper-bundle.min.css" />
 
    <link rel="stylesheet" href="style.css" />
 
  </head>
 
  <body>
 
    <!-- Header / Navbar -->
 
    <header>
 
      <nav class="navbar">
 
        <a href="#" class="nav-logo">
 
          <h2 class="logo-text">☕ Coffee</h2>
 
        </a>
 
        <ul class="nav-menu">
 
          <button id="menu-close-button" class="fas fa-times"></button>
 
          <li class="nav-item">
 
            <a href="#" class="nav-link">Home</a>
 
          </li>
 
          <li class="nav-item">
 
            <a href="#about" class="nav-link">About</a>
 
          </li>
 
          <li class="nav-item">
 
            <a href="#menu" class="nav-link">Menu</a>
 
          </li>
 
          <li class="nav-item">
 
            <a href="#testimonials" class="nav-link">Testimonials</a>
 
          </li>
 
          <li class="nav-item">
 
            <a href="#gallery" class="nav-link">Gallery</a>
 
          </li>
 
          <li class="nav-item">
 
            <a href="#contact" class="nav-link">Contact</a>
 
          </li>
 
        </ul>
 
        <button id="menu-open-button" class="fas fa-bars"></button>
 
      </nav>
 
    </header>
 
    <main>
 
      <!-- Hero section -->
 
      <section class="hero-section">
 
        <div class="section-content">
 
          <div class="hero-details">
 
            <h2 class="title">Best Coffee</h2>
 
            <h3 class="subtitle">Make your day great with our special coffee!</h3>
 
            <p class="description">Welcome to our coffee paradise, where every bean tells a story and every cup sparks joy.</p>
 
            <div class="buttons">
 
              <a href="#" class="button order-now">Order Now</a>
 
              <a href="#contact" class="button contact-us">Contact Us</a>
 
            </div>
 
          </div>
 
          <div class="hero-image-wrapper">
 
            <img src="images/coffee-hero-section.png" alt="Coffee" class="hero-image" />
 
          </div>
 
        </div>
 
      </section>
 
      <!-- About section -->
 
      <section class="about-section" id="about">
 
        <div class="section-content">
 
          <div class="about-image-wrapper">
 
            <img src="images/about-image.jpg" alt="About" class="about-image" />
 
          </div>
 
          <div class="about-details">
 
            <h2 class="section-title">About Us</h2>
 
            <p class="text">At Coffee House in Berndorf, Germany, we pride ourselves on being a go-to destination for coffee lovers and conversation seekers alike. We're dedicated to providing an exceptional coffee experience in a cozy and inviting atmosphere, where guests can relax, unwind, and enjoy their time in comfort.</p>
 
            <div class="social-link-list">
 
              <a href="#" class="social-link"><i class="fa-brands fa-facebook"></i></a>
 
              <a href="#" class="social-link"><i class="fa-brands fa-instagram"></i></a>
 
              <a href="#" class="social-link"><i class="fa-brands fa-x-twitter"></i></a>
 
            </div>
 
          </div>
 
        </div>
 
      </section>
 
      <!-- Menu section -->
 
      <section class="menu-section" id="menu">
 
        <h2 class="section-title">Our Menu</h2>
 
        <div class="section-content">
 
          <ul class="menu-list">
 
            <li class="menu-item">
 
              <img src="images/hot-beverages.png" alt="Hot Beverages" class="menu-image" />
 
              <div class="menu-details">
 
                <h3 class="name">Hot Beverages</h3>
 
                <p class="text">Wide range of Steaming hot coffee to make you fresh and light.</p>
 
              </div>
 
            </li>
 
            <li class="menu-item">
 
              <img src="images/cold-beverages.png" alt="Cold Beverages" class="menu-image" />
 
              <div class="menu-details">
 
                <h3 class="name">Cold Beverages</h3>
 
                <p class="text">Creamy and frothy cold coffee to make you cool.</p>
 
              </div>
 
            </li>
 
            <li class="menu-item">
 
              <img src="images/refreshment.png" alt="Refreshment" class="menu-image" />
 
              <div class="menu-details">
 
                <h3 class="name">Refreshment</h3>
 
                <p class="text">Fruit and icy refreshing drink to make feel refresh.</p>
 
              </div>
 
            </li>
 
            <li class="menu-item">
 
              <img src="images/special-combo.png" alt="Special Combos" class="menu-image" />
 
              <div class="menu-details">
 
                <h3 class="name">Special Combos</h3>
 
                <p class="text">Your favorite eating and drinking combations.</p>
 
              </div>
 
            </li>
 
            <li class="menu-item">
 
              <img src="images/desserts.png" alt="Dessert" class="menu-image" />
 
              <div class="menu-details">
 
                <h3 class="name">Dessert</h3>
 
                <p class="text">Satiate your palate and take you on a culinary treat.</p>
 
              </div>
 
            </li>
 
            <li class="menu-item">
 
              <img src="images/burger-frenchfries.png" alt="burger & French Fries" class="menu-image" />
 
              <div class="menu-details">
 
                <h3 class="name">Burger & French Fries</h3>
 
                <p class="text">Quick bites to satisfy your small size hunger.</p>
 
              </div>
 
            </li>
 
          </ul>
 
        </div>
 
      </section>
 
      <!-- Testimonials section -->
 
      <section class="testimonials-section" id="testimonials">
 
        <h2 class="section-title">Testimonials</h2>
 
        <div class="section-content">
 
          <div class="slider-container swiper">
 
            <div class="slider-wrapper">
 
              <ul class="testimonials-list swiper-wrapper">
 
                <li class="testimonial swiper-slide">
 
                  <img src="images/user-1.jpg" alt="User" class="user-image" />
 
                  <h3 class="name">Sarah Johnson</h3>
 
                  <i class="feedback">"Loved the French roast. Perfectly balanced and rich. Will order again!"</i>
 
                </li>
 
                <li class="testimonial swiper-slide">
 
                  <img src="images/user-2.jpg" alt="User" class="user-image" />
 
                  <h3 class="name">James Wilson</h3>
 
                  <i class="feedback">"Great espresso blend! Smooth and bold flavor. Fast shipping too!"</i>
 
                </li>
 
                <li class="testimonial swiper-slide">
 
                  <img src="images/user-3.jpg" alt="User" class="user-image" />
 
                  <h3 class="name">Michael Brown</h3>
 
                  <i class="feedback">"Fantastic mocha flavor. Fresh and aromatic. Quick shipping!"</i>
 
                </li>
 
                <li class="testimonial swiper-slide">
 
                  <img src="images/user-4.jpg" alt="User" class="user-image" />
 
                  <h3 class="name">Emily Harris</h3>
 
                  <i class="feedback">"Excellent quality! Fresh beans and quick delivery. Highly recommend."</i>
 
                </li>
 
                <li class="testimonial swiper-slide">
 
                  <img src="images/user-5.jpg" alt="User" class="user-image" />
 
                  <h3 class="name">Anthony Thompson</h3>
 
                  <i class="feedback">"Best decaf I've tried! Smooth and flavorful. Arrived promptly."</i>
 
                </li>
 
              </ul>
 
              <div class="swiper-pagination"></div>
 
              <div class="swiper-slide-button swiper-button-prev"></div>
 
              <div class="swiper-slide-button swiper-button-next"></div>
 
            </div>
 
          </div>
 
        </div>
 
      </section>
 
      <!-- Gallery section -->
 
      <section class="gallery-section" id="gallery">
 
        <h2 class="section-title">Gallery</h2>
 
        <div class="section-content">
 
          <ul class="gallery-list">
 
            <li class="gallery-item">
 
              <img src="images/gallery-1.jpg" alt="Gallery Image" class="gallery-image" />
 
            </li>
 
            <li class="gallery-item">
 
              <img src="images/gallery-2.jpg" alt="Gallery Image" class="gallery-image" />
 
            </li>
 
            <li class="gallery-item">
 
              <img src="images/gallery-3.jpg" alt="Gallery Image" class="gallery-image" />
 
            </li>
 
            <li class="gallery-item">
 
              <img src="images/gallery-4.jpg" alt="Gallery Image" class="gallery-image" />
 
            </li>
 
            <li class="gallery-item">
 
              <img src="images/gallery-5.jpg" alt="Gallery Image" class="gallery-image" />
 
            </li>
 
            <li class="gallery-item">
 
              <img src="images/gallery-6.jpg" alt="Gallery Image" class="gallery-image" />
 
            </li>
 
          </ul>
 
        </div>
 
      </section>
 
      <!-- Contact section -->
 
      <section class="contact-section" id="contact">
 
        <h2 class="section-title">Contact Us</h2>
 
        <div class="section-content">
 
          <ul class="contact-info-list">
 
            <li class="contact-info">
 
              <i class="fa-solid fa-location-crosshairs"></i>
 
              <p>123 Campsite Avenue, Wilderness, CA 98765</p>
 
            </li>
 
            <li class="contact-info">
 
              <i class="fa-regular fa-envelope"></i>
 
              <p>[email protected]</p>
 
            </li>
 
            <li class="contact-info">
 
              <i class="fa-solid fa-phone"></i>
 
              <p>(123) 456-78909</p>
 
            </li>
 
            <li class="contact-info">
 
              <i class="fa-regular fa-clock"></i>
 
              <p>Monday - Friday: 9:00 AM - 5:00 PM</p>
 
            </li>
 
            <li class="contact-info">
 
              <i class="fa-regular fa-clock"></i>
 
              <p>Saturday: 10:00 AM - 3:00 PM</p>
 
            </li>
 
            <li class="contact-info">
 
              <i class="fa-regular fa-clock"></i>
 
              <p>Sunday: Closed</p>
 
            </li>
 
            <li class="contact-info">
 
              <i class="fa-solid fa-globe"></i>
 
              <p>www.abhikesh.com</p>
 
            </li>
 
          </ul>
 
          <form action="#" class="contact-form">
 
            <input type="text" placeholder="Your name" class="form-input" required />
 
            <input type="email" placeholder="Your email" class="form-input" required />
 
            <textarea placeholder="Your message" class="form-input" required></textarea>
 
            <button type="submit" class="button submit-button">Submit</button>
 
          </form>
 
        </div>
 
      </section>
 
      <!-- Footer section -->
 
      <footer class="footer-section">
 
        <div class="section-content">
 
          <p class="copyright-text">© 2024 Coffee Shop</p>
 
          <div class="social-link-list">
 
            <a href="#" class="social-link"><i class="fa-brands fa-facebook"></i></a>
 
            <a href="#" class="social-link"><i class="fa-brands fa-instagram"></i></a>
 
            <a href="#" class="social-link"><i class="fa-brands fa-x-twitter"></i></a>
 
          </div>
 
          <p class="policy-text">
 
            <a href="#" class="policy-link">Privacy policy</a>
 
            <span class="separator">•</span>
 
            <a href="#" class="policy-link">Refund policy</a>
 
          </p>
 
        </div>
 
      </footer>
 
    </main>
 
    <!-- Linking Swiper script -->
 
    <script src="https://cdn.jsdelivr.net/npm/swiper@11/swiper-bundle.min.js"></script>
 
    <!-- Linking custom script -->
 
    <script src="script.js"></script>
 
  </body>
 
</html>

5. Style the website with CSS: In your style.css file, use modern CSS properties to design the website. Experiment with colors, typography, backgrounds, and layouts to make your coffee website visually appealing.

/* Google Fonts Link */
@import url('https://fonts.googleapis.com/css2?family=Miniver&family=Poppins:ital,wght@0,400;0,500;0,600;0,700;1,400&display=swap');

* {
padding: 0;
margin: 0;
box-sizing: border-box;
font-family: "Poppins", sans-serif;
}

:root {
/* Colors */
--white-color: #fff;
--dark-color: #252525;
--primary-color: #3b141c;
--secondary-color: #f3961c;
--light-pink-color: #faf4f5;
--medium-gray-color: #ccc;

/* Font size */
--font-size-s: 0.9rem;
--font-size-n: 1rem;
--font-size-m: 1.12rem;
--font-size-l: 1.5rem;
--font-size-xl: 2rem;
--font-size-xxl: 2.3rem;

/* Font weight */
--font-weight-normal: 400;
--font-weight-medium: 500;
--font-weight-semibold: 600;
--font-weight-bold: 700;

/* Border radius */
--border-radius-s: 8px;
--border-radius-m: 30px;
--border-radius-circle: 50%;

/* Site max width */
--site-max-width: 1300px;
}

html {
scroll-behavior: smooth;
}

/* Stylings for whole site */
ul {
list-style: none;
}

a {
text-decoration: none;
}

button {
cursor: pointer;
background: none;
border: none;
}

img {
width: 100%;
}

:where(section, footer) .section-content {
margin: 0 auto;
padding: 0 20px;
max-width: var(--site-max-width);
}

section .section-title {
text-align: center;
padding: 60px 0 100px;
text-transform: uppercase;
font-size: var(--font-size-xl);
}

section .section-title::after {
content: "";
width: 80px;
height: 5px;
display: block;
margin: 10px auto 0;
background: var(--secondary-color);
border-radius: var(--border-radius-s);
}

/* Navbar styling */
header {
z-index: 5;
width: 100%;
position: fixed;
background: var(--primary-color);
}

header .navbar {
display: flex;
padding: 20px;
align-items: center;
margin: 0 auto;
justify-content: space-between;
max-width: var(--site-max-width);
}

.navbar .nav-logo .logo-text {
color: var(--white-color);
font-size: var(--font-size-xl);
font-weight: var(--font-weight-semibold);
}

.navbar .nav-menu {
gap: 10px;
display: flex;
}

.navbar .nav-menu .nav-link {
padding: 10px 18px;
color: var(--white-color);
font-size: var(--font-size-m);
border-radius: var(--border-radius-m);
transition: 0.3s ease;
}

.navbar .nav-menu .nav-link:hover {
color: var(--primary-color);
background: var(--secondary-color);
}

.navbar :where(#menu-open-button, #menu-close-button) {
display: none;
}

/* Hero section styling */
.hero-section {
min-height: 100vh;
background: var(--primary-color);
}

.hero-section .section-content {
display: flex;
padding-top: 40px;
align-items: center;
min-height: 100vh;
justify-content: space-between;
}

.hero-section .hero-details {
color: var(--white-color);
}

.hero-section .hero-details .title {
font-size: var(--font-size-xxl);
color: var(--secondary-color);
font-family: "Miniver", sans-serif;
}

.hero-section .hero-details .subtitle {
margin-top: 8px;
max-width: 70%;
font-size: var(--font-size-xl);
font-weight: var(--font-weight-semibold);
}

.hero-section .hero-details .description {
max-width: 70%;
margin: 24px 0 40px;
font-size: var(--font-size-m);
}

.hero-section .hero-details .buttons {
display: flex;
gap: 23px;
}

.hero-section .hero-details .button {
padding: 10px 26px;
display: block;
border: 2px solid transparent;
border-radius: var(--border-radius-m);
background: var(--secondary-color);
color: var(--primary-color);
font-size: var(--font-size-m);
font-weight: var(--font-weight-medium);
transition: 0.3s ease;
}

.hero-section .hero-details .button:hover,
.hero-section .hero-details .button.contact-us {
color: var(--white-color);
border-color: var(--white-color);
background: transparent;
}

.hero-section .hero-details .button.contact-us:hover {
color: var(--primary-color);
background: var(--secondary-color);
border-color: var(--secondary-color);
}

.hero-section .hero-image-wrapper {
max-width: 500px;
margin-right: 30px;
}

/* About section styling */
.about-section {
padding: 120px 0;
background: var(--light-pink-color);
}

.about-section .section-content {
display: flex;
gap: 50px;
align-items: center;
justify-content: space-between;
}

.about-section .about-image-wrapper .about-image {
height: 400px;
width: 400px;
object-fit: cover;
border-radius: var(--border-radius-circle);
}

.about-section .about-details {
max-width: 50%;
}

.about-section .about-details .section-title {
padding: 0;
}

.about-section .about-details .text {
line-height: 30px;
margin: 50px 0 30px;
text-align: center;
font-size: var(--font-size-m);
}

.about-section .social-link-list {
display: flex;
gap: 25px;
justify-content: center;
}

.about-section .social-link-list .social-link {
color: var(--primary-color);
font-size: var(--font-size-l);
transition: 0.2s ease;
}

.about-section .social-link-list .social-link:hover {
color: var(--secondary-color);
}

/* Menu section styling */
.menu-section {
color: var(--white-color);
background: var(--dark-color);
padding: 50px 0 100px;
}

.menu-section .menu-list {
display: flex;
gap: 110px;
flex-wrap: wrap;
align-items: center;
justify-content: space-between;
}

.menu-section .menu-list .menu-item {
display: flex;
text-align: center;
flex-direction: column;
align-items: center;
justify-content: space-between;
width: calc(100% / 3 - 110px);
}

.menu-section .menu-list .menu-item .menu-image {
width: 83%;
aspect-ratio: 1;
margin-bottom: 15px;
object-fit: contain;
}

.menu-section .menu-list .menu-item .name {
margin: 12px 0;
font-size: var(--font-size-l);
font-weight: var(--font-weight-semibold);
}

.menu-section .menu-list .menu-item .text {
font-size: var(--font-size-m);
}

/* Testimonials section styling */
.testimonials-section {
padding: 50px 0 100px;
background: var(--light-pink-color);
}

.testimonials-section .slider-wrapper {
overflow: hidden;
margin: 0 60px 50px;
}

.testimonials-section .testimonial {
user-select: none;
padding: 35px;
display: flex;
flex-direction: column;
justify-content: center;
align-items: center;
text-align: center;
}

.testimonials-section .testimonial .user-image {
width: 180px;
height: 180px;
margin-bottom: 50px;
object-fit: cover;
border-radius: var(--border-radius-circle);
}

.testimonials-section .testimonial .name {
margin-bottom: 16px;
font-size: var(--font-size-m);
}

.testimonials-section .testimonial .feedback {
line-height: 25px;
}

.testimonials-section .swiper-pagination-bullet {
width: 15px;
height: 15px;
opacity: 1;
background: var(--secondary-color);
}

.testimonials-section .swiper-slide-button {
color: var(--secondary-color);
margin-top: -50px;
transition: 0.3s ease;
}

.testimonials-section .swiper-slide-button:hover {
color: var(--primary-color);
}

/* Gallery section styling */
.gallery-section {
padding: 50px 0 100px;
}

.gallery-section .gallery-list {
display: flex;
gap: 32px;
flex-wrap: wrap;
}

.gallery-section .gallery-list .gallery-item {
overflow: hidden;
border-radius: var(--border-radius-s);
width: calc(100% / 3 - 32px);
}

.gallery-section .gallery-item .gallery-image {
width: 100%;
height: 100%;
cursor: zoom-in;
transition: 0.3s ease;
}

.gallery-section .gallery-item:hover .gallery-image {
transform: scale(1.3);
}

/* Contact section styling */
.contact-section {
padding: 50px 0 100px;
background: var(--light-pink-color);
}

.contact-section .section-content {
display: flex;
gap: 48px;
align-items: center;
justify-content: space-between;
}

.contact-section .contact-info-list .contact-info {
display: flex;
gap: 20px;
margin: 20px 0;
align-items: center;
}

.contact-section .contact-info-list .contact-info i {
font-size: var(--font-size-m);
}

.contact-section .contact-form .form-input {
width: 100%;
height: 50px;
padding: 0 12px;
outline: none;
margin-bottom: 16px;
font-size: var(--font-size-s);
border-radius: var(--border-radius-s);
border: 1px solid var(--medium-gray-color);
}

.contact-section .contact-form {
max-width: 50%;
}

.contact-section .contact-form textarea.form-input {
height: 100px;
padding: 12px;
resize: vertical;
}

.contact-section .contact-form .form-input:focus {
border-color: var(--secondary-color);
}

.contact-section .contact-form .submit-button {
padding: 10px 28px;
outline: none;
margin-top: 10px;
border: 1px solid var(--primary-color);
border-radius: var(--border-radius-m);
background: var(--primary-color);
color: var(--white-color);
font-size: var(--font-size-m);
font-weight: var(--font-weight-medium);
transition: 0.3s ease;
}

.contact-section .contact-form .submit-button:hover {
color: var(--primary-color);
background: transparent;
}

/* Footer section styling */
.footer-section {
padding: 20px 0;
background: var(--dark-color);
}

.footer-section .section-content {
display: flex;
align-items: center;
justify-content: space-between;
}

.footer-section :where(.copyright-text, .social-link, .policy-link) {
color: var(--white-color);
transition: 0.2s ease;
}

.footer-section .social-link-list {
display: flex;
gap: 25px;
}

.footer-section .social-link-list .social-link {
font-size: var(--font-size-l);
}

.footer-section .social-link-list .social-link:hover,
.footer-section .policy-text .policy-link:hover {
color: var(--secondary-color);
}

.footer-section .policy-text .separator {
color: #fff;
margin: 0 5px;
}

/* Responsive media query code for max width 1024px */
@media screen and (max-width: 1024px) {
.menu-section .menu-list {
gap: 60px;
}

.menu-section .menu-list .menu-item {
width: calc(100% / 3 - 60px);
}

}

/* Responsive media query code for max width 900px */
@media screen and (max-width: 900px) {
:root {
--font-size-m: 1rem;
--font-size-l: 1.3rem;
--font-size-xl: 1.5rem;
--font-size-xxl: 1.8rem;
}

body.show-mobile-menu {
overflow: hidden;
}

body.show-mobile-menu header::before {
content: "";
content: '';
position: fixed;
top: 0;
left: 0;
height: 100%;
width: 100%;
backdrop-filter: blur(5px);
background: rgba(0, 0, 0, 0.2);
}

.navbar :is(#menu-open-button, #menu-close-button) {
font-size: var(--font-size-l);

display: block;
}

.navbar :is(#menu-open-button, #menu-close-button):hover {
color: var(--secondary-color) !important;
}

.navbar #menu-open-button {
color: #fff;
}

.navbar .nav-menu #menu-close-button {
position: absolute;
right: 30px;
top: 30px;
}

.navbar .nav-menu {
display: block;
background: #fff;
position: fixed;
top: 0;
left: -300px;
height: 100%;
width: 300px;
display: flex;
align-items: center;
flex-direction: column;
padding-top: 100px;
transition: left 0.2s ease;
}

body.show-mobile-menu .nav-menu {
left: 0;
}

.navbar .nav-menu .nav-link {
display: block;
margin-top: 17px;
padding: 10px 22px;
color: var(--dark-color);
font-size: var(--font-size-l);
}

.hero-section .section-content {
text-align: center;
gap: 50px;
padding: 30px 20px 20px;
justify-content: center;
flex-direction: column-reverse;
}

.hero-section .hero-details :is(.subtitle, .description),
.about-section .about-details,
.contact-section .contact-form {
max-width: 100%;
}

.hero-section .hero-details .buttons {
justify-content: center;
}

.hero-section .hero-image-wrapper {
max-width: 270px;
margin-right: 0;
}

.about-section .section-content {
gap: 70px;
flex-direction: column-reverse;
}

.about-section .about-image-wrapper .about-image {
width: 100%;
height: 100%;
aspect-ratio: 1;
max-width: 250px;
}

.menu-section .menu-list {
gap: 30px;
}

.menu-section .menu-list .menu-item {
width: calc(100% / 2 - 30px);
}

.menu-section .menu-list .menu-item .menu-image {
max-width: 200px;
}

.gallery-section .gallery-list {
gap: 30px;
}

.gallery-section .gallery-list .gallery-item {
width: calc(100% / 2 - 30px);
}

.contact-section .section-content {
align-items: center;
flex-direction: column-reverse;
}
}

/* Responsive media query code for max width 640px */
@media screen and (max-width: 640px) {

.menu-section .menu-list .menu-item,
.gallery-section .gallery-list .gallery-item {
width: 100%;
}

.menu-section .menu-list {
gap: 60px;
}

.testimonials-section .slider-wrapper {
margin: 0 0 30px;
}

.testimonials-section .swiper-slide-button {
display: none;
}

.footer-section .section-content {
flex-direction: column;
gap: 20px;
}
}

6. Add functionality with JavaScript: In your script.js file, write JavaScript code to add interactive features. This includes:

  • Initializing the Swiper slider for the Testimonials section.
  • Creating a hamburger menu for mobile navigation that enhances the user experience.
const navbarLinks = document.querySelectorAll(".nav-menu .nav-link");
const menuOpenButton = document.querySelector("#menu-open-button");
const menuCloseButton = document.querySelector("#menu-close-button");

menuOpenButton.addEventListener("click", () => {
// Toggle mobile menu visibility
document.body.classList.toggle("show-mobile-menu");
});

// Close menu when the close button is clicked
menuCloseButton.addEventListener("click", () => menuOpenButton.click());

// Close menu when nav link is clicked
navbarLinks.forEach((link) => {
link.addEventListener("click", () => menuOpenButton.click());
});

/* Initializing Swiper */
let swiper = new Swiper(".slider-wrapper", {
loop: true,
grabCursor: true,
spaceBetween: 25,

// Pagination bullets
pagination: {
el: ".swiper-pagination",
clickable: true,
dynamicBullets: true,
},

// Navigation arrows
navigation: {
nextEl: ".swiper-button-next",
prevEl: ".swiper-button-prev",
},

/* Responsive breakpoints */
breakpoints: {
0: {
slidesPerView: 1,
},
768: {
slidesPerView: 2,
},
1024: {
slidesPerView: 3,
},
},
});

Once you’ve completed these steps, open the index.html file in your browser to preview your coffee website. You’ll see how responsive it looks across different screen sizes, from mobile to desktop.

Why Build a Responsive Coffee Website?

Creating a responsive coffee website offers several benefits:

  • Mobile Optimization: As more users access websites on their phones, ensuring your site looks great on any device is crucial.
  • Interactive Features: By adding dynamic elements like sliders and animated menus, you can provide a richer experience for visitors.
  • Portfolio Boost: If you’re a beginner, this project is a great way to show off your web development skills and can be a perfect addition to your portfolio.
Want to Check Username Availability on Social Media?If you’re looking to check username availability on various social media platforms, visit NameChkr to find out!
Read Also

  1. Glassmorphism Login Form in HTML and CSS
    Explore the stylish world of glassmorphism as you create a modern login form using HTML and CSS. This guide breaks down the design process step by step.
  2. Toggle Button using HTML, CSS, and JavaScript
    Discover how to enhance user interaction by creating a sleek toggle button with HTML, CSS, and JavaScript. This tutorial covers everything from structure to styling.
  3. Responsive Cards in HTML and CSS
    Learn how to design eye-catching responsive cards that adapt seamlessly to any device. This guide offers practical tips for achieving stunning layouts.
  4. Build a Google Gemini Chatbot Using HTML, CSS, and JS
    Dive into chatbot development by creating a Google Gemini chatbot with HTML, CSS, and JavaScript. This tutorial will help you understand the basics of interactive forms.

Conclusion

In conclusion, building a responsive coffee website using HTML, CSS, and JavaScript is a fantastic way to enhance your web development skills. Through this project, you’ve learned how to structure a website, style it with CSS, and add dynamic functionality with JavaScript. Each section, from the homepage to the footer, offers valuable hands-on experience to help you grow as a front-end developer.

Take this opportunity to explore other website projects and further develop your HTML, CSS, and JavaScript expertise. You can experiment with different features like sliders, animations, and responsive layouts, which are in high demand in today’s web design world.

If you need the full source code for this coffee website, you can download it below and use it as a reference for your projects.

Download the Source Code

Click the button below to download the complete source code for the Responsive Coffee Website project.

Are you looking to add some dynamic flair to your website? Look no further than Multiple Typing Text Animations! This tutorial will show you how to create engaging and interactive multiple-typing text animations using HTML, CSS, and JavaScript. This effect is a fantastic way to capture visitors’ attention and make your website more interactive and modern.

What Are Multiple Typing Text Animations?

Multiple typing text animations are dynamic animations where the text automatically changes, similar to the effect of a classic typewriter. These animations have become increasingly popular in web design for their ability to engage users and give websites a modern, professional touch. Whether you’re building a portfolio, personal blog, or business site, these animations keep your visitors interested.

Why Use Multiple Typing Text Animations?

There are several reasons why multiple typing text animations can enhance your website:

  1. Increased Engagement: Animated text naturally draws the user’s eye, increasing engagement with your content.
  2. Modern Appeal: These animations provide a sleek, contemporary look that keeps your website updated with modern design trends.
  3. Versatile Applications: Multiple typing text animations can be adapted to suit various contexts, from highlighting critical services to showcasing essential skills.

How to Create Multiple Typing Text Animations

Creating this effect is easier than you might think! We’ll guide you step-by-step on implementing multiple typing text animations on your website. This project involves two types of text: one part remains static, while the other dynamically cycles through different phrases in a smooth, typewriter-like motion.

We’ll use a combination of HTML, CSS, and JavaScript for this. CSS will be responsible for the styling and basic animation, while JavaScript will control the text’s cycling.
Step 1: Setting Up the HTML Structure
First, you must create the HTML structure for your static and dynamic text. Minimal HTML allows us to focus more on the visual effects and animation.

HTML Code

<!DOCTYPE html>
<html lang="en">
<head>
<meta charset="UTF-8">
<meta http-equiv="X-UA-Compatible" content="IE=edge">
<meta name="viewport" content="width=device-width, initial-scale=1.0">
<link rel="stylesheet" href="style.css">
</head>
<body>
      <div class="container">
          <span class="text first-text">I'm a</span>
          <span class="text sec-text">Designer</span>
      </div>
<script>
      const text = document.querySelector(".sec-text");

      const textLoad = () => {
      setTimeout(() => {
      text.textContent = "Designer";
      }, 0);
      setTimeout(() => {
      text.textContent = "Blogger";
      }, 4000);
      setTimeout(() => {
      text.textContent = "YouTuber";
      }, 8000);
      }

      textLoad();
      setInterval(textLoad, 12000);
</script>
</body>
</html>

Step 2: Styling with CSS
We’ll style the text using CSS to give it a professional and polished look and manage the smooth typing animation effect for the dynamic text.

@import url('https://fonts.googleapis.com/css2?family=Poppins:wght@200;300;400;500;600&display=swap');

* {
    margin: 0;
    padding: 0;
    box-sizing: border-box;
    font-family: 'Poppins', sans-serif;
}

body {
    min-height: 100vh;

    align-items: center;
    justify-content: center;
    background: #010718;
    overflow: hidden;
}

.container {
    width: 246px;
    overflow: hidden;
}

.container .text {
    position: relative;
    color: #4070F4;
    font-size: 30px;
    font-weight: 600;
}

.container .text.first-text {
    color: #FFF;
}

.text.sec-text:before {
    content: "";
    position: absolute;
    top: 0;
    left: 0;
    height: 100%;
    width: 100%;
    background-color: #010718;
    border-left: 2px solid #4070F4;
    animation: animate 4s steps(12) infinite;
}

@keyframes animate {
    40%, 60% {
        left: calc(100% + 4px);
    }
    100% {
        left: 0%;
    }
}
Want to Check Username Availability on Social Media?If you’re looking to check username availability on various social media platforms, visit NameChkr to find out!
Read Also

  1. Glassmorphism Login Form in HTML and CSS
    Explore the stylish world of glassmorphism as you create a modern login form using HTML and CSS. This guide breaks down the design process step by step.
  2. Toggle Button using HTML, CSS, and JavaScript
    Discover how to enhance user interaction by creating a sleek toggle button with HTML, CSS, and JavaScript. This tutorial covers everything from structure to styling.
  3. Responsive Cards in HTML and CSS
    Learn how to design eye-catching responsive cards that adapt seamlessly to any device. This guide offers practical tips for achieving stunning layouts.
  4. Build a Google Gemini Chatbot Using HTML, CSS, and JS
    Dive into chatbot development by creating a Google Gemini chatbot with HTML, CSS, and JavaScript. This tutorial will help you understand the basics of interactive forms.

Conclusion

Adding multiple typing text animations to your website is an excellent way to make your content more engaging and modern. Whether you’re building a professional portfolio or a business website, this effect will help you capture your audience’s attention.

Don’t forget to download the complete source code below to experiment with multiple typing text animations on your site!

Download the Source Code
Click the button below to download this project’s complete source code and start immediately!

Sliders are a fantastic way to present content on websites, especially if you’re aiming for a clean and interactive design. Whether you’re showcasing products, portfolios, or images, a responsive card slider can really enhance your website’s user experience.

In this guide, I’ll show you how to create a responsive card slider using HTML, CSS, and JavaScript, and to make it even more appealing, we’ll incorporate the glassmorphism effect. Using SwiperJS, a popular JavaScript library for sliders, we can make the slider touch-friendly and fully responsive for both mobile and desktop.

By the end of this tutorial, you’ll have a fully functional and responsive image slider that you can add to your own website.

Why Use SwiperJS for a Responsive Slider?

SwiperJS is one of the best libraries available for creating interactive and mobile-friendly sliders. It’s easy to set up, highly customizable, and supports modern features like touch gestures, lazy loading, and autoplay.

If you prefer to understand the mechanics behind building sliders from scratch, you can also try creating a slider using vanilla JavaScript. It will help deepen your JavaScript skills, giving you full control over the slider’s behavior.

Now, let’s dive into building our responsive card slider!

Step-by-Step Guide to Creating a Responsive Card Slider with HTML, CSS & JavaScript

Step-by-Step Guide to Creating a Responsive Card Slider with HTML, CSS & JavaScript

1. Set Up Your Project Folder
To begin, create a folder for your project. You can name it something like card-slider. Inside the folder, create the following essential files:

  • index.html for the HTML markup
  • style.css for the CSS styles
  • script.js for the JavaScript code

2. Prepare the Images
For the slider, you’ll need images. Place your images in a folder within the project directory called images. You can use any set of images you like, but it’s important to optimize them for faster loading on both mobile and desktop.

3. Write the HTML Code
In your index.html file, you’ll set up the structure of your card slider. Be sure to include the SwiperJS CDN links to enable all the functionality that the library offers.

<!DOCTYPE html>
<!-- Coding By Abhikesh - www.abhikesh.com -->
<html lang="en">
<head>
  <meta charset="UTF-8">
  <meta name="viewport" content="width=device-width, initial-scale=1.0">
  <title>Card Slider HTML and CSS | Abhikesh</title>
  <!-- Linking SwiperJS CSS -->
  <link rel="stylesheet" href="https://cdn.jsdelivr.net/npm/swiper@11/swiper-bundle.min.css">
  <link rel="stylesheet" href="style.css">
</head>
<body>
  <div class="container swiper">
    <div class="slider-wrapper">
      <div class="card-list swiper-wrapper">
        <div class="card-item swiper-slide">
          <img src="images/img-1.jpg" alt="User Image" class="user-image">
          <h2 class="user-name">James Wilson</h2>
          <p class="user-profession">Software Developer</p>
          <button class="message-button">Send</button>
        </div>
        <div class="card-item swiper-slide">
          <img src="images/img-2.jpg" alt="User Image" class="user-image">
          <h2 class="user-name">Sarah Johnson</h2>
          <p class="user-profession">Graphic Designer</p>
          <button class="message-button">Send</button>
        </div>
        <div class="card-item swiper-slide">
          <img src="images/img-3.jpg" alt="User Image" class="user-image">
          <h2 class="user-name">Michael Brown</h2>
          <p class="user-profession">Project Manager</p>
          <button class="message-button">Send</button>
        </div>
        <div class="card-item swiper-slide">
          <img src="images/img-4.jpg" alt="User Image" class="user-image">
          <h2 class="user-name">Emily Davis</h2>
          <p class="user-profession">Marketing Specialist</p>
          <button class="message-button">Send</button>
        </div>
        <div class="card-item swiper-slide">
          <img src="images/img-5.jpg" alt="User Image" class="user-image">
          <h2 class="user-name">Christopher Garcia</h2>
          <p class="user-profession">Data Scientist</p>
          <button class="message-button">Send</button>
        </div>
        <div class="card-item swiper-slide">
          <img src="images/img-6.jpg" alt="User Image" class="user-image">
          <h2 class="user-name">Richard Wilson</h2>
          <p class="user-profession">Product Designer</p>
          <button class="message-button">Send</button>
        </div>
      </div>
      <div class="swiper-pagination"></div>
      <div class="swiper-slide-button swiper-button-prev"></div>
      <div class="swiper-slide-button swiper-button-next"></div>
    </div>
  </div>
  <!-- Linking SwiperJS script -->
  <script src="https://cdn.jsdelivr.net/npm/swiper@11/swiper-bundle.min.js"></script>
  <!-- Linking custom script -->
  <script src="script.js"></script>
</body>
</html>
4. Style the Slider with CSS
In style.css, you’ll define how your slider looks. We’re using a modern glassmorphism effect, which will give your slider a frosted glass-like appearance. Feel free to play with different color schemes, shadows, and backgrounds to personalize the look.
/* Importing Google Font - Montserrat */
@import url('https://fonts.googleapis.com/css2?family=Montserrat:ital,wght@0,100..900;1,100..900&display=swap');
* {
  margin: 0;
  padding: 0;
  box-sizing: border-box;
  font-family: "Montserrat", sans-serif;
}
body {
  display: flex;
  align-items: center;
  justify-content: center;
  min-height: 100vh;
  background: url("images/bg.jpg") #030728 no-repeat center;
}
.slider-wrapper {
  overflow: hidden;
  max-width: 1200px;
  margin: 0 70px 55px;
}
.card-list .card-item {
  height: auto;
  color: #fff;
  user-select: none;
  padding: 35px;
  display: flex;
  flex-direction: column;
  align-items: center;
  justify-content: center;
  border-radius: 10px;
  backdrop-filter: blur(30px);
  background: rgba(255, 255, 255, 0.2);
  border: 1px solid rgba(255, 255, 255, 0.5);
}
.card-list .card-item .user-image {
  width: 150px;
  height: 150px;
  border-radius: 50%;
  margin-bottom: 40px;
  border: 3px solid #fff;
  padding: 4px;
}
.card-list .card-item .user-profession {
  font-size: 1.15rem;
  color: #e3e3e3;
  font-weight: 500;
  margin: 14px 0 40px;
}
.card-list .card-item .message-button {
  font-size: 1.25rem;
  padding: 10px 35px;
  color: #030728;
  border-radius: 6px;
  font-weight: 500;
  cursor: pointer;
  background: #fff;
  border: 1px solid transparent;
  transition: 0.2s ease;
}
.card-list .card-item .message-button:hover {
  background: rgba(255, 255, 255, 0.1);
  border: 1px solid #fff;
  color: #fff;
}
.slider-wrapper .swiper-pagination-bullet {
  background: #fff;
  height: 13px;
  width: 13px;
  opacity: 0.5;
}
.slider-wrapper .swiper-pagination-bullet-active {
  opacity: 1;
}
.slider-wrapper .swiper-slide-button {
  color: #fff;
  margin-top: -55px;
  transition: 0.2s ease;
}
.slider-wrapper .swiper-slide-button:hover {
  color: #4658ff;
}
@media (max-width: 768px) {
  .slider-wrapper {
    margin: 0 10px 40px;
  }
  .slider-wrapper .swiper-slide-button {
    display: none;
  }
}
5. Add JavaScript for Functionality
In script.js, you’ll initialize SwiperJS and add the interactivity. This is where you can configure various features like autoplay, pagination, and touch gestures to make the slider functional across devices.
const swiper = new Swiper('.slider-wrapper', {
    loop: true,
    grabCursor: true,
    spaceBetween: 30,
    // Pagination bullets
    pagination: {
      el: '.swiper-pagination',
      clickable: true,
      dynamicBullets: true
    },
    // Navigation arrows
    navigation: {
      nextEl: '.swiper-button-next',
      prevEl: '.swiper-button-prev',
    },
    // Responsive breakpoints
    breakpoints: {
      0: {
        slidesPerView: 1
      },
      768: {
        slidesPerView: 2
      },
      1024: {
        slidesPerView: 3
      }
    }
  });
Want to Check Username Availability on Social Media?If you’re looking to check username availability on various social media platforms, visit NameChkr to find out!
Read Also

  1. Glassmorphism Login Form in HTML and CSS
    Explore the stylish world of glassmorphism as you create a modern login form using HTML and CSS. This guide breaks down the design process step by step.
  2. Toggle Button using HTML, CSS, and JavaScript
    Discover how to enhance user interaction by creating a sleek toggle button with HTML, CSS, and JavaScript. This tutorial covers everything from structure to styling.
  3. Responsive Cards in HTML and CSS
    Learn how to design eye-catching responsive cards that adapt seamlessly to any device. This guide offers practical tips for achieving stunning layouts.
  4. Build a Google Gemini Chatbot Using HTML, CSS, and JS
    Dive into chatbot development by creating a Google Gemini chatbot with HTML, CSS, and JavaScript. This tutorial will help you understand the basics of interactive forms.

Conclusion: Building a Responsive Slider for Modern Websites
By following this tutorial, you’ve successfully created a responsive card slider using HTML, CSS, and JavaScript (SwiperJS). This slider not only enhances your website’s visual appeal but also improves the user experience, especially for mobile users.

Feel free to customize the slider by experimenting with different settings in SwiperJS, such as pagination, navigation, and transitions. For more advanced customization, refer to the SwiperJS documentation to unlock its full potential and personalize your slider.

Additionally, if you prefer a ready-made version, you can download the project files by clicking the button below. This will allow you to explore the code in more detail or implement it directly into your own projects.

In today’s digital world, creating a responsive website in HTML and CSS is an essential skill for web designers and developers. Whether showcasing your portfolio, hosting a blog, or simply experimenting with web design, having a responsive site ensures your content looks great on any device.

This guide is perfect for beginners who want to build their first responsive website in HTML and CSS. We’ll walk you through creating an engaging homepage featuring an interactive navigation bar and styling elements that make your website visually appealing and user-friendly.

Why Build a Responsive Website in HTML and CSS?

Responsive websites adjust seamlessly across different screen sizes and devices, making them accessible to a broader audience. By using only HTML and CSS, you can create a fully functional and aesthetically pleasing website without relying on complex coding frameworks.

Step-by-Step Guide to Creating a Responsive Website in HTML and CSS

Follow these simple steps to build your very own responsive website:
Step 1: Set Up Your Project

  1. Create a folder for your project and name it something relevant.
  2. Inside this folder, create two files: index.html (for the HTML structure) and style.css (for the CSS styling).

Step 2: Create the HTML Structure

In your index.html file, add the following basic HTML markup. This includes semantic tags like <header>, <nav>, <h1>, <h2>, and <ul> for your navigation:

Hello friends, in this blog post, you will learn how to build a functional contact form in PHP. This form will utilize HTML, CSS, JavaScript, and PHP to create a fully functional contact system for your website. Contact forms enable visitors to reach out directly to the site owner. In this tutorial, you’ll see how to create a functional PHP contact form that includes fields for user information like their name, email address, and message subject.

The functional contact form in PHP is vital to any website as it allows seamless communication between users and the website owner. You can customize this form’s fields based on your website’s needs. This project ensures validation to guarantee users input valid email addresses and messages.

Why Build a Functional Contact Form in PHP?

  • Direct Communication: A contact form allows users to communicate directly with you, avoiding the need for them to open an email client.
  • Data Validation: The form ensures that valid emails and messages are submitted, reducing spam and errors.
  • Customization: You can customize the form fields to gather more data or offer specific queries.

How the Functional PHP Contact Form Works

This functional contact form in PHP has dynamic status text that indicates whether a message has been successfully sent. The form is fully validated using JavaScript, so users must enter a valid email and message before submitting.

Unlike traditional contact forms that refresh the page upon submission, this contact form uses Ajax. It sends all form data (name, email, phone, message) through Ajax to a PHP script, which processes the information and sends it via email using the PHP mail() function.

Steps to Create a Functional PHP Contact Form

  1. Create the HTML File: Name the file index.html, and include form fields like name, email, and message. This is the structure of the contact form.
<!DOCTYPE html>
<html lang="en">
<head>
  <meta charset="UTF-8">
  <meta name="viewport" content="width=device-width, initial-scale=1.0">
  <title>Contact Form in PHP</title>
  <link rel="stylesheet" href="style.css">
  <link rel="stylesheet" href="https://fonts.googleapis.com/icon?family=Material+Icons">
  <link rel="stylesheet" href="https://cdnjs.cloudflare.com/ajax/libs/font-awesome/5.15.3/css/all.min.css"/>
</head>
<body>
  <div class="wrapper">
    <header>Send us a Message</header>
    <form action="#">
      <div class="dbl-field">
        <div class="field">
          <input type="text" name="name" placeholder="Enter your name">
          <i class='fas fa-user'></i>
        </div>
        <div class="field">
          <input type="text" name="email" placeholder="Enter your email">
          <i class='fas fa-envelope'></i>
        </div>
      </div>
      <div class="dbl-field">
        <div class="field">
          <input type="text" name="phone" placeholder="Enter your phone">
          <i class='fas fa-phone-alt'></i>
        </div>
        <div class="field">
          <input type="text" name="website" placeholder="Enter your website">
          <i class='fas fa-globe'></i>
        </div>
      </div>
      <div class="message">
        <textarea placeholder="Write your message" name="message"></textarea>
        <i class="material-icons">message</i>
      </div>
      <div class="button-area">
        <button type="submit">Send Message</button>
        <span></span>
      </div>
    </form>
  </div>
  <script src="script.js"></script>
</body>
</html>

2. Create the CSS File: Name it style.css, and apply styles to make the form look professional and responsive.

/* Import Google font - Poppins */
@import url('https://fonts.googleapis.com/css2?family=Poppins:wght@400;500;600&display=swap');
*{
  margin: 0;
  padding: 0;
  box-sizing: border-box;
  font-family: "Poppins", sans-serif;
}
body{
  display: flex;
  padding: 0 10px;
  min-height: 100vh;
  background: #0D6EFD;
  align-items: center;
  justify-content: center;
}
::selection{
  color: #fff;
  background: #0D6EFD;
}
.wrapper{
  width: 715px;
  background: #fff;
  border-radius: 5px;
  box-shadow: 10px 10px 10px rgba(0,0,0,0.05);
}
.wrapper header{
  font-size: 22px;
  font-weight: 600;
  padding: 20px 30px;
  border-bottom: 1px solid #ccc;
}
.wrapper form{
  margin: 35px 30px;
}
.wrapper form.disabled{
  pointer-events: none;
  opacity: 0.7;
}
form .dbl-field{
  display: flex;
  margin-bottom: 25px;
  justify-content: space-between;
}
.dbl-field .field{
  height: 50px;
  display: flex;
  position: relative;
  width: calc(100% / 2 - 13px);
}
.wrapper form i{
  position: absolute;
  top: 50%;
  left: 18px;
  color: #ccc;
  font-size: 17px;
  pointer-events: none;
  transform: translateY(-50%);
}
form .field input,
form .message textarea{
  width: 100%;
  height: 100%;
  outline: none;
  padding: 0 18px 0 48px;
  font-size: 16px;
  border-radius: 5px;
  border: 1px solid #ccc;
}
.field input::placeholder,
.message textarea::placeholder{
  color: #ccc;
}
.field input:focus,
.message textarea:focus{
  padding-left: 47px;
  border: 2px solid #0D6EFD;
}
.field input:focus ~ i,
.message textarea:focus ~ i{
  color: #0D6EFD;
}
form .message{
  position: relative;
}
form .message i{
  top: 30px;
  font-size: 20px;
}
form .message textarea{
  min-height: 130px;
  max-height: 230px;
  max-width: 100%;
  min-width: 100%;
  padding: 15px 20px 0 48px;
}
form .message textarea::-webkit-scrollbar{
  width: 0px;
}
.message textarea:focus{
  padding-top: 14px;
}
form .button-area{
  margin: 25px 0;
  display: flex;
  align-items: center;
}
.button-area button{
  color: #fff;
  border: none;
  outline: none;
  font-size: 18px;
  cursor: pointer;
  border-radius: 5px;
  padding: 13px 25px;
  background: #0D6EFD;
  transition: background 0.3s ease;
}
.button-area button:hover{
  background: #025ce3;
}
.button-area span{
  font-size: 17px;
  margin-left: 30px;
  display: none;
}
@media (max-width: 600px){
  .wrapper header{
    text-align: center;
  }
  .wrapper form{
    margin: 35px 20px;
  }
  form .dbl-field{
    flex-direction: column;
    margin-bottom: 0px;
  }
  form .dbl-field .field{
    width: 100%;
    height: 45px;
    margin-bottom: 20px;
  }
  form .message textarea{
    resize: none;
  }
  form .button-area{
    margin-top: 20px;
    flex-direction: column;
  }
  .button-area button{
    width: 100%;
    padding: 11px 0;
    font-size: 16px;
  }
  .button-area span{
    margin: 20px 0 0;
    text-align: center;
  }
}

3. Create the JavaScript File: Use script.js to validate the form and send data via Ajax.

//Contact Form in PHP
const form = document.querySelector("form"),
statusTxt = form.querySelector(".button-area span");
form.onsubmit = (e)=>{
  e.preventDefault();
  statusTxt.style.color = "#0D6EFD";
  statusTxt.style.display = "block";
  statusTxt.innerText = "Sending your message...";
  form.classList.add("disabled");

  let xhr = new XMLHttpRequest();
  xhr.open("POST", "message.php", true);
  xhr.onload = ()=>{
    if(xhr.readyState == 4 && xhr.status == 200){
      let response = xhr.response;
      if(response.indexOf("required") != -1 || response.indexOf("valid") != -1 || response.indexOf("failed") != -1){
        statusTxt.style.color = "red";
      }else{
        form.reset();
        setTimeout(()=>{
          statusTxt.style.display = "none";
        }, 3000);
      }
      statusTxt.innerText = response;
      form.classList.remove("disabled");
    }
  }
  let formData = new FormData(form);
  xhr.send(formData);
}

4. Create the PHP File: This file, named message.php, will process the form submission. Be sure to set your email as the $receiver to receive messages.

//Contact Form in PHP
<?php
  $name = htmlspecialchars($_POST['name']);
  $email = htmlspecialchars($_POST['email']);
  $phone = htmlspecialchars($_POST['phone']);
  $website = htmlspecialchars($_POST['website']);
  $message = htmlspecialchars($_POST['message']);

  if(!empty($email) && !empty($message)){
    if(filter_var($email, FILTER_VALIDATE_EMAIL)){
      $receiver = "receiver_email_address"; //enter that email address where you want to receive all messages
      $subject = "From: $name <$email>";
      $body = "Name: $name\nEmail: $email\nPhone: $phone\nWebsite: $website\n\nMessage:\n$message\n\nRegards,\n$name";
      $sender = "From: $email";
      if(mail($receiver, $subject, $body, $sender)){
         echo "Your message has been sent";
      }else{
         echo "Sorry, failed to send your message!";
      }
    }else{
      echo "Enter a valid email address!";
    }
  }else{
    echo "Email and message field is required!";
  }
?>
Want to Check Username Availability on Social Media?If you’re looking to check username availability on various social media platforms, visit NameChkr to find out!
Read Also

  1. Glassmorphism Login Form in HTML and CSS
    Explore the stylish world of glassmorphism as you create a modern login form using HTML and CSS. This guide breaks down the design process step by step.
  2. Toggle Button using HTML, CSS, and JavaScript
    Discover how to enhance user interaction by creating a sleek toggle button with HTML, CSS, and JavaScript. This tutorial covers everything from structure to styling.
  3. Responsive Cards in HTML and CSS
    Learn how to design eye-catching responsive cards that adapt seamlessly to any device. This guide offers practical tips for achieving stunning layouts.
  4. Build a Google Gemini Chatbot Using HTML, CSS, and JS
    Dive into chatbot development by creating a Google Gemini chatbot with HTML, CSS, and JavaScript. This tutorial will help you understand the basics of interactive forms.

Final Words

Building a functional contact form in PHP is a great way to improve user interaction on your website. The tutorial above helps you easily create and integrate a contact form that works smoothly without requiring page reloads. If you encounter issues, you can download the complete source code using the button below. Customize the form as needed to fit your website’s unique needs!

Hello there. I hope that all is going great with you. In this post, you will learn how to create a Toggle Button using HTML, CSS, and JavaScript. I recently designed an adorable shape Toggle Button that you may find appealing; today’s button is simple yet effective.
Toggle buttons can be added to any webpage or application to enable or disable specific aspects. For instance, to turn on Wi-Fi, you would use this type of button. They are helpful on various pages in software programs and other front-end components for similar purposes.
Please look at the image of our toggle button I posted online. As shown, one toggle button is closed while its counterpart opens up, but in reality, there is only one toggle button that we must click to open or close; only its circular part moves.
I believe you can quickly design this toggle button using HTML, CSS, and JavaScript. If you’re having difficulty creating an easy toggle switch, here is the complete source code;

Hamburger Menu Button that Has Loading Animation

Switch Button [Source Code] and Toggle Button (Source Code).

To create an animated Button using HTML, CSS, and JavaScript code, it’s necessary to create two separate files—one HTML and the other CSS. Once these have been made, copy-paste their contents into your document before downloading them in their entirety by clicking the Download Button.

<!DOCTYPE html>
    <html lang="en">
    <head>
        <meta charset="UTF-8">
        <meta http-equiv="X-UA-Compatible" content="IE=edge">
        <meta name="viewport" content="width=device-width, initial-scale=1.0">
       <title>Toggle Button Animation</title>
        <!-- CSS -->
        <link rel="stylesheet" href="css/style.css">
    </head>
    <body>
        <div></div>
        <!-- JavaScript -->
        <script>
            const toggleBtn = document.querySelector(".toggle");
            toggleBtn.addEventListener("click", () => toggleBtn.classList.toggle("active"));
        </script>
    </body>
</html>


*{
  margin: 0;
  padding: 0;
  box-sizing: border-box;
}
body{
  height: 100vh;
  display: flex;
  align-items: center;
  justify-content: center;
  background: #7d2ae8;
}
.toggle{
  position: relative;
  height: 12px;
  width: 125px;
  cursor: pointer;
  border-radius: 25px;
  background-color: #fff;
  box-shadow: 0 5px 10px rgba(0, 0, 0, 0.1);
}
.toggle::before{
  content: "";
  position: absolute;
  left: 0;
  top: 50%;
  transform: translateY(-50%);
  height: 50px;
  width: 50px;
  border-radius: 50%;
  background-color: #7d2ae8;
  border: 10px solid #fff;
  transition: all 0.5s cubic-bezier(0.68, -0.55, 0.265, 1.55);
  box-shadow: 0 5px 10px rgba(0, 0, 0, 0.1);
}
.toggle.active::before{
  left: calc(100% - 70px);
  background-color: #fff;
  border-color: #7d2ae8;
}
Want to Check Username Availability on Social Media?If you’re looking to check username availability on various social media platforms, visit NameChkr to find out!
Read Also

  1. Glassmorphism Login Form in HTML and CSS
    Explore the stylish world of glassmorphism as you create a modern login form using HTML and CSS. This guide breaks down the design process step by step.
  2. Toggle Button using HTML, CSS, and JavaScript
    Discover how to enhance user interaction by creating a sleek toggle button with HTML, CSS, and JavaScript. This tutorial covers everything from structure to styling.
  3. Responsive Cards in HTML and CSS
    Learn how to design eye-catching responsive cards that adapt seamlessly to any device. This guide offers practical tips for achieving stunning layouts.
  4. Build a Google Gemini Chatbot Using HTML, CSS, and JS
    Dive into chatbot development by creating a Google Gemini chatbot with HTML, CSS, and JavaScript. This tutorial will help you understand the basics of interactive forms.